
Bear Mt/Harriman Trails
Besides the thirty-five 3500 foot peaks in the Catskills, there are many other smaller mountains to climb. In addition, there are hundreds of miles of trails to hike. There are also MANY other places to hike also. I have divided the Trails section into list of All Trail, the Catskills, the Shawangunks, Bear Mt/Harriman, East Hudson, West Hudson, New Jersey and Other Trails. The All Trails list includes over 400 different trails and may load slowly on your computer. The "divided" list should load more quickly.
You can view all the Bear Mt/Harriman Trails here.
Clicking on ![]() will bring up an index of trails. Clicking on
will bring up an index of trails. Clicking on ![]() will return you to the top of the page.
will return you to the top of the page.
Anthony's Nose and Bear Mountain
| Quick Look | ||||
|---|---|---|---|---|
| Difficulty | Round trip | Total climb | Internet Maps | |
| 8.5 miles | 2400 feet | AllTrails | ||
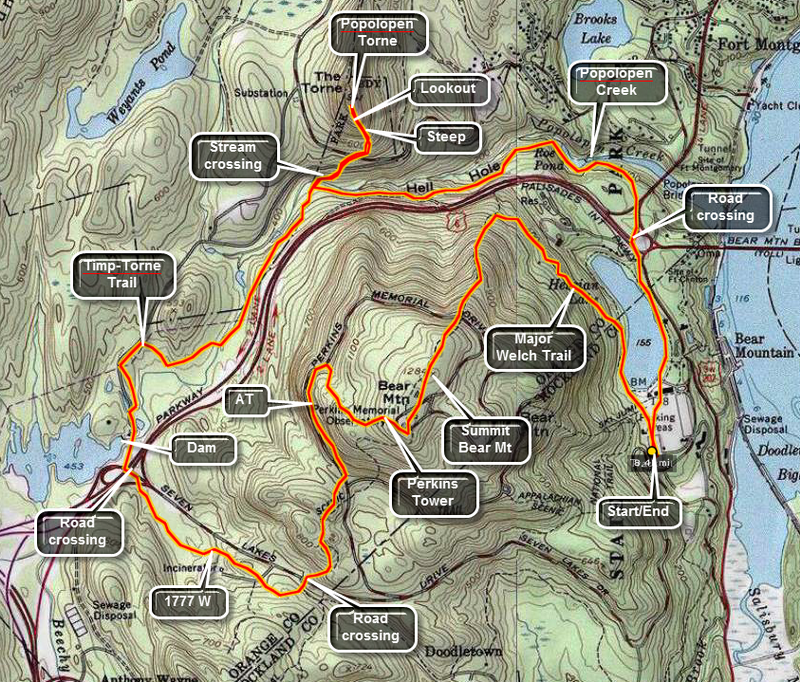
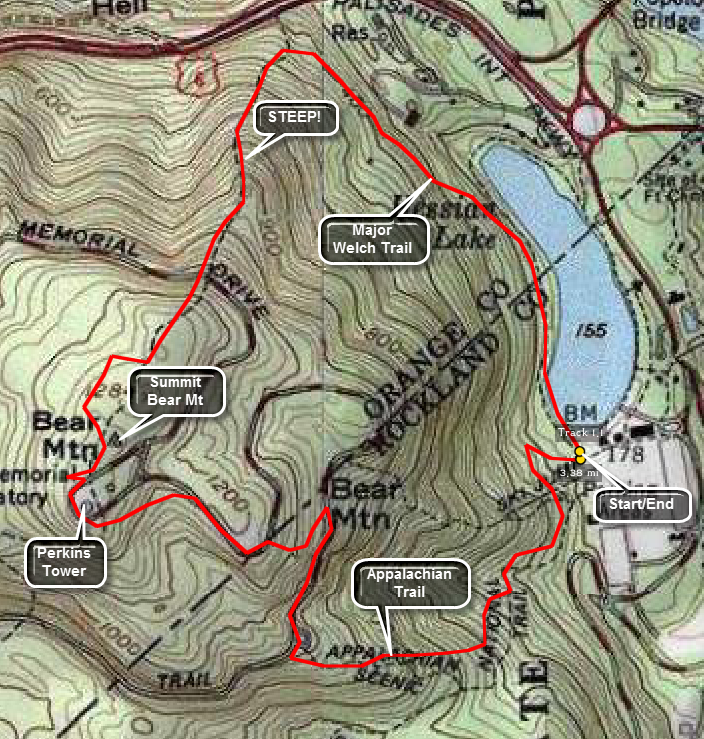
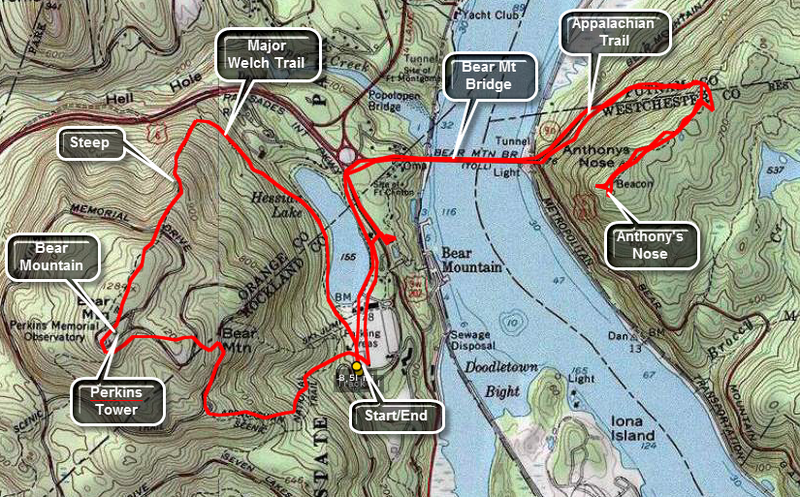 Park in any of the parking lots at the Bear Mountain Inn off Route 202/9W. The two trails that allow
access to Bear Mountain are the Appalachian Trail and the Major Welch Trail. Begin by walking passed the skating rink
and down to the footpath around Hessian Lake. Stay to the left of the lake and look for the red on white blazes that
mark the Major Welch Trail. Watch carefully for TWO of the blazes which signify the place where the trail turns left
and into the woods. At first this trail slowly climbs passed the Overlook Lodge and the ascent seems easy. Look are
definitely deceiving! Shortly the trail begins its real ascent which becomes steep and difficult at times with
several short but interesting scrambles over exposed rock face. About 2/3 of the way up the mountain, the trail
crosses Perkins Drive and then heads back into the woods. Near the top of the climb are several lookouts with
spectacular views of the Hudson River and the Bear Mountain Bridge. The trail continues on to the top of the mountain
and the Perkins Tower.
Park in any of the parking lots at the Bear Mountain Inn off Route 202/9W. The two trails that allow
access to Bear Mountain are the Appalachian Trail and the Major Welch Trail. Begin by walking passed the skating rink
and down to the footpath around Hessian Lake. Stay to the left of the lake and look for the red on white blazes that
mark the Major Welch Trail. Watch carefully for TWO of the blazes which signify the place where the trail turns left
and into the woods. At first this trail slowly climbs passed the Overlook Lodge and the ascent seems easy. Look are
definitely deceiving! Shortly the trail begins its real ascent which becomes steep and difficult at times with
several short but interesting scrambles over exposed rock face. About 2/3 of the way up the mountain, the trail
crosses Perkins Drive and then heads back into the woods. Near the top of the climb are several lookouts with
spectacular views of the Hudson River and the Bear Mountain Bridge. The trail continues on to the top of the mountain
and the Perkins Tower.
From here find the white blazes of the AT as it heads down the mountain. This trail is not as steep as the Major Welch as it winds its way down the mountain. The trail briefly intersects a road where you should turn right and follow it to a small parking area that overlooks the river. The trail turns right onto a road but immediately turns left and down into the woods. Continue following the AT. It will intersect the yellow blazed Suffern Bear Mountain Trail near the bottom. Turn left at this point and make your way back to the parking area.
At this point you can end the hike and feel very satisfied with the sights you have seen or you can set out to Anthony's Nose. Walk toward Hessian Lake but this time head to the right. Watch for the white blazes of the AT and the 1777 markers. You may take the tunnel under 9W and follow the AT through the zoo. This costs $1, is sometimes closed AND DOES NOT ALLOW PETS. You can also follow the shoulder of 9W to the Bear Mountain traffic circle. Cross here and head for the pedestrian Walkway on the north OR south side of the bridge. Take a moment to enjoy the views up and own the river. Straight ahead at the other end of the bridge rises Anthony's Nose. At the end of the bridge turn left and walk the shoulder of 9D for about .2 miles. Look for the white AT blazes and a trail head kiosk on the right side of the road. Here the AT turns up into the woods. The trail initially winds its way toward the rocky crag which is Anthony's Nose. Shortly it turns upward with several steep portions. A few level parts and switchbacks help you catch your breath. At the top the AT heads northeast to the left. Turn to the right on the woods road through Camp Smith. This trail is marked by blue blazes and heads directly toward your destination. Near the end of the trail there is an obvious blazed turn to the left. This DOES NOT lead to the Nose but does give some interesting views if the river and the surrounding mountains. Turn right at this T and you are at Anthony's Nose. Walk out to any of the prominent rock outcrops to get incredible views up and down the river. Be careful as there is no protection from a short but fast fall 900 feet to the river below. The views down on the bridge and to the water itself ARE breath taking. The way back is simply to retrace your steps perhaps taking the walkway on the other side of the bridge.
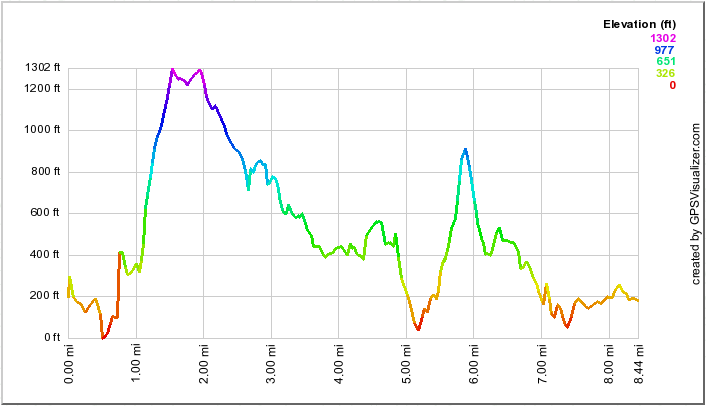
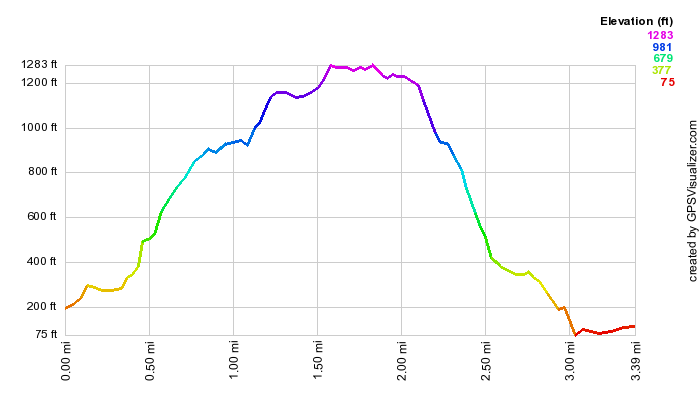
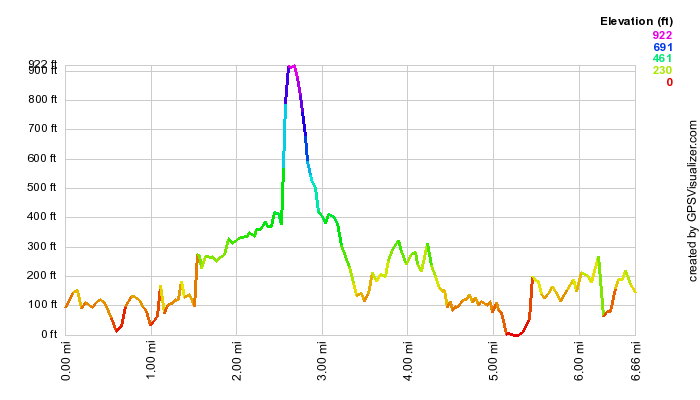
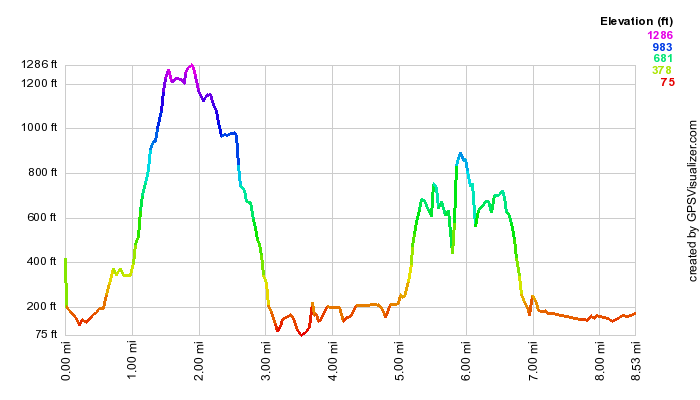 (The image at the left shows the profile of the hike. Remember that all vertical profiles are relative!)
Bear Mountain: Bear and West Mountains
| Quick Look | ||||
|---|---|---|---|---|
| Difficulty | Round trip | Total climb | Internet Maps | |
| 7.9 mi. | 2540 ft. | AllTrails | ||
 The easiest place to park to start this hike is at the Bear Mountain Inn parking area next to Hessian Lake. Parking costs $6 per car but there is lots of it and bathroom facilities are available. There area several ways to get to the parking area but Route 9W north or south is the easiest way. You can also take Seven Lakes Drive from Long Mountain Parkway (Route 6). Stay on Seven Lakes Drive through another traffic circle. Park in the back parking area. Walk the outdoor ice rink but turn left up the hill before it. At the top of a short, steep hill there is a road which is also marked with the yellow blazes of the Suffern-Bear Mountain Trail and the white blazes of the Appalachian Trail. Follow these blazes as the trail curves first to the right and then to the left as it descends and crosses a small stream. The trails then begin a continuous although not steep ascent. After only about .3 miles the AT turns to the right. Stay on the SBM Trail.
This trail continues to climb slightly before descending to cross Seven Lakes Drive after about .45 miles. It then continues to descend after meeting an old woods road until it meets the Doodletown Bridal Path after about .6 miles. Turn right here and follow the yellow blazes as the trail descends to Doodletown Brook after .5 miles. The brook is easily crossed in this area. On the left you may notice some paths down to another branch of the brook. These paths are created by other hikers looking for the Herbert Mine. Walk down to and across the brook and toward the rock to the south and slightly west. Watch for the LARGE piles of mine tailings and climb the hillside toward this mine debris. The main working of the Herbert Mine is a an open cut into the hillside which is impossible to miss. The cut appears to be 30 to 40 feet long and twenty feet high at the end. The cut in this area is filled with water but may go underground. When you have finished, walk up the hillside above the cut for a fresh perspective. There are several other pits and cuts in the area. Walk back west and northwest toward the brook. The SBM Trail is on the other side of the stream.
The trail now begins to ascend through laurel and begins to offer glimpses of some spectacular views. Wait since the best views are yet to come. There are several short buy steep climbs over rock piles before the trail breaks out into the open and continues to ascend to the summit of West Mountain and the West Mountain Ridge. After a little more than a mile it intersects with the blue blazed Timp-Torne Trail. You will want to turn right here to get back to bear Mountain but first turn left. In less than .1 miles is the West Mountain Shelter. The views from here are spectacular. Bald Mountain and The Timp are clearly visible. There is a nice view down to the Hudson River and on a clear day the Skyline of New York City can be seen. Retrace your steps and follow the blue and yellow blazes as they run concurrently.
In less than .25 miles the SBM trail turns left and heads south and west. Stay on the Timp-Torne Trail and in about the same distance the Appalachian Trail comes in from the left. The trails now wander along the ridge with interesting views on both sides. After 1.15 miles the trail split with the Timp-Torne Trail continuing on north and slightly west toward The Torne. Stay on the AT as it turns right and starts a long descent. Just before the descent are several views points over the Hudson River. Look carefully for the Bear Mountain Bridge. The Perkins Tower on the top of Bear Mountain can easily be scene straight ahead. It looks very close but there is a significant descent and ascent before reaching it. As you descend you will see the red Fawn Trail go off to the right. In .6 miles the AT crosses Seven Lakes Drive. Just before this the 1777W Trail crosses the AT. Turning right on this trail leads back to the Suffern-Bear Mountain Trail which may be an easier way to return to the parking area.
After crossing the road the AT ascends to the top of Bear Mountain at the Perkins Tower. The trail does undulate at times but the net results is always up. After .5 miles the AT meets the road and runs along Perkins Drive for .4 miles before cutting back into the forest and starting the final ascent to the tower. There are several viewpoints along Perkins Drive which are quite nice. After about .5 miles of ascent, the Perkins Tower comes into view. The views from Bear Mountain are nice but the views from West Mountain are better. Bear Mountain is more talked about since Perkins Drive allows easier access than the trails to West Mountain
After taking in the walk back to the AT and follow it down the mountain to the parking area. The trail crosses the road twice and goes through the picnic area. After ,4 miles it joins a road for about .25 miles before again entering the woods and descending. in .4 miles the AT again meets the SBM Trail that you were on earlier in the day. Retrace your path for .3 miles back to the car.
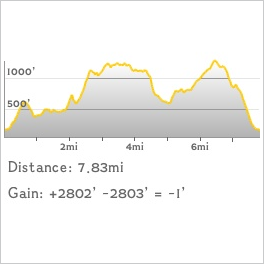 (The image at the left shows the profile of the hike. Remember that all vertical profiles are
relative!)
(The image at the left shows the profile of the hike. Remember that all vertical profiles are
relative!)
Bear Mountain: Bear Mt and The Torne
| Quick Look | ||||
|---|---|---|---|---|
| Difficulty | Round trip | Total climb | Internet Maps | |
| 8.4 mi. | 3420 ft. | AllTrails | ||
The easiest place to park to start this hike is at the Bear Mountain Inn parking area next to Hessian Lake. Parking costs $6 per car but there is lots of it and bathroom facilities are available. There area several ways to get to the parking area but Route 9W north or south is the easiest way. You can also take Seven Lakes Drive from Long Mountain Parkway (Route 6). Stay on Seven Lakes Drive through another traffic circle. Park in the back parking area. Walk along the front of the outdoor ice rink and continue on the pathway on the left side of the lake. Just before the end of the lake, watch for the spot where the red on white blazes turn left off the pathway and start up the hill at about .5 miles. The Major Welch Trail can be steep at times and runs across several exposed rock faces. The rocks can be slippery even when dry but are treacherous when wet.
At 1.5 miles the trail ascends sharply and crosses Perkins Drive for the first time. Go across the road and pick up the trail slightly to the left. As you ascend now occasionally look over your shoulder. As you near the top of the climb wonderful views of the Bear Mountain Bridge will appear below. You can also Se up and down the river for some distance depending on the weather. At 1.71 miles cross Perkins Drive again and walk passed the tower to the lookout area. Here you can see the river below and get good views of the surrounding area. On a clear day it is possible to see the Manhattan skyline to the south. When you are done. walk on Perkins Drive through the parking area to the left of the tower. Look for the white blazes of the at coming up the hill. Turn left and descend until you meet Perkins Drive at 2,25 miles. As you walk down this section of the trail you will cross several rocky areas and walk through laurel "tunnels".
Walk down the road following the AT until it enters the woods on the right at 2.7 miles. Be careful of the vehicle traffic when the road is open. Continue to follow the AT and cross Seven Lakes Drive at 3.1 miles. Immediately after crossing the road look for the metal disks that are labeled 1777W. They should appear on your right just after crossing the road. Get on this trail and follow it until 3.88 miles where it again meets Seven Lakes Drive. Walk along the road following the blazes as the trail crosses over Rout 9W. Turn right at 3.95 miles and watch for Queensboro Lake and its dam at 4.05 miles. You will be on a paved pathway briefly until it becomes more rustic after it passes a building on your left. At 4.3 miles the trail intersects a woods road and the signage is unclear. Turn RIGHT onto the road and watch for the blazes as the trail shortly turns right at 4.4 miles.
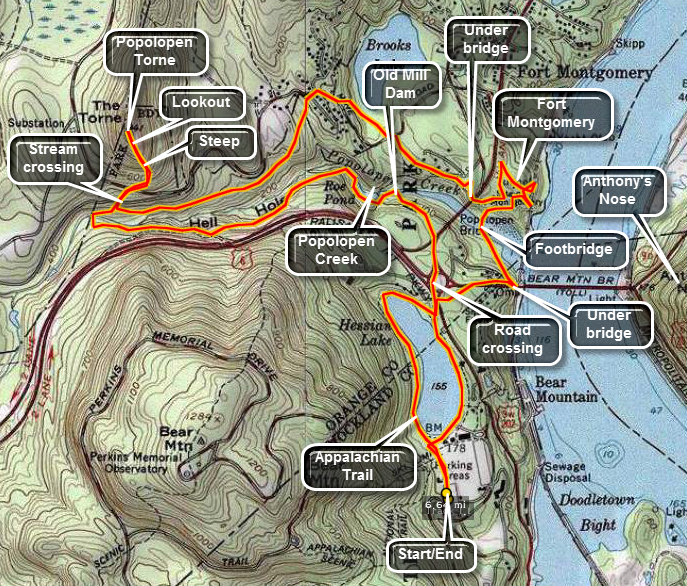
At 4.7 miles the trail crosses a creek on an interesting "bridge". The exact nature of this bridge and some of the "structures" next to it are unclear. At 5.35 miles the trail splits. Straight ahead the trail leads to Route 9W. For now turn left and cross a substantial footbridge across Popolopen Creek. Follow the trail as it turns right unto a road and then immediately left up into the woods. At 5.5 miles the trail crosses Mine Road and then begins to wind around to the "back" of The Torne. From here the trail ascends STEEPLY up The Torne. There are several rocks scrambles and the ascent can be VERY tricky when the rock is wet or covered in ice or snow. As you ascend views of Bear Mountain and the Hudson River come into view. The Bear Mountain Bridge and Anthony's Nose are spread out below. The top of The Torne is completely open and has little vegetation making it ideal for viewing in all directions. You can look up and down the river and east and west. Don't miss the monument at the top constructed of rocks carried from the base of The Torne to the top to remember members of the armed services killed in the war in Iraq. When you are done retrace your steps carefully back to the bridge and up the hill to the trail you cam in one from the southeast.
> Turn to your left at 6.1 miles and to the east. Walk the trail along Popolopen Gorge and the creek. At 7.1 miles watch for a dam on your left. The view varies depending on the foliage on the trees. Continue on the trail until it meets the road at 7.27 miles. BE CAREFUL at this point as you walk the road up to the Bear Mountain traffic circle and cross over to the far side to get to Hessian Lake and the path around it at 7.55 miles. Follow the paved path around the lake by turning left and heading toward the Bear Mountain and back to the parking lot to complete the 8.4 mile trip.
 (The image at the left shows the profile of the hike. Remember that all vertical profiles are
relative!)
(The image at the left shows the profile of the hike. Remember that all vertical profiles are
relative!)
Bear Mountain: Cornell Mine Trail to Bald Mountain
| Quick Look | ||||
|---|---|---|---|---|
| Difficulty | Round trip | Total climb | Internet Maps | |
| 3.0 miles | 1290 ft | AllTrails | ||
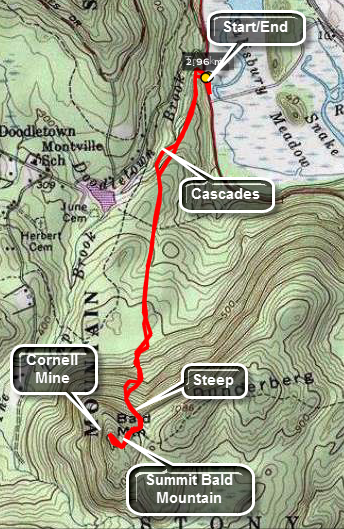 Park on Route 9W where it meets Route 202 from the Bear Mountain traffic circle. The parking is just
after a small bridge over Doodletown Creek. Cross the road and get on the trail just to the left of the
bridge. The blazes for the Cornell Mine Trail are blue and quite visible. Like all the trails in the
park there is no sign that announces the beginning of the trail. After a short climb the trail levels
and then rolls for a while. When the water levels are high the creek has several nice rapids and small
falls. As you are walking you cannot help but notice that up ahead the land rises quickly. When the
trail does start to climb it starts gently but rapidly increases in difficulty. Most of the
climbing would be almost impossible without the switchbacks, Switchbacks add to the hiking distance
but make the climbing easier. Just when you think the hardest part is over near the top, the last few
hundred feet get steeper! Near the top the trail ends where it meets the Ramapo-Dunderberg Trail.
Turn right on this red blazed trail. A short hike puts you on Bald Mountain facing directly
toward Bear Mountain. The Perkins Tower is clearly visible almost two miles to the north. Just down
from the summit of the mountain are several depressions and one tunnel that make up the Cornell
Mines. At this point you can retrace your way back down the Cornell Mine Trail or use one of
the trails on the other side of Bald Mountain to make a loop.
Park on Route 9W where it meets Route 202 from the Bear Mountain traffic circle. The parking is just
after a small bridge over Doodletown Creek. Cross the road and get on the trail just to the left of the
bridge. The blazes for the Cornell Mine Trail are blue and quite visible. Like all the trails in the
park there is no sign that announces the beginning of the trail. After a short climb the trail levels
and then rolls for a while. When the water levels are high the creek has several nice rapids and small
falls. As you are walking you cannot help but notice that up ahead the land rises quickly. When the
trail does start to climb it starts gently but rapidly increases in difficulty. Most of the
climbing would be almost impossible without the switchbacks, Switchbacks add to the hiking distance
but make the climbing easier. Just when you think the hardest part is over near the top, the last few
hundred feet get steeper! Near the top the trail ends where it meets the Ramapo-Dunderberg Trail.
Turn right on this red blazed trail. A short hike puts you on Bald Mountain facing directly
toward Bear Mountain. The Perkins Tower is clearly visible almost two miles to the north. Just down
from the summit of the mountain are several depressions and one tunnel that make up the Cornell
Mines. At this point you can retrace your way back down the Cornell Mine Trail or use one of
the trails on the other side of Bald Mountain to make a loop.
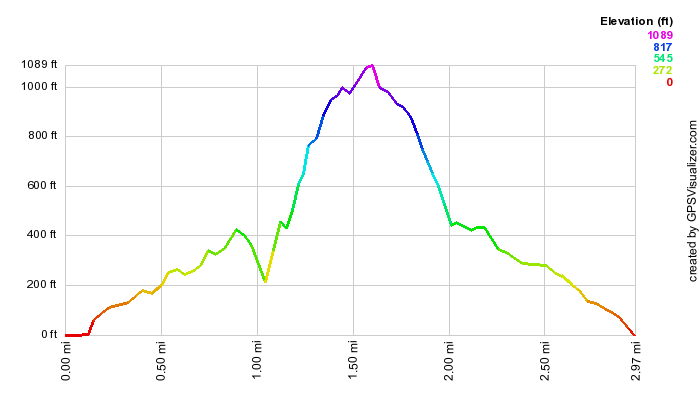
(The image below shows the profile of the hike. Remember that all vertical profiles are relative!)
Bear Mountain: Loop
| Quick Look | ||||
|---|---|---|---|---|
| Difficulty | Round trip | Total climb | Internet Maps | |
| 3.4 miles | 1200 feet | AllTrails | ||
 Park in any of the parking lots at the Bear Mountain Inn off Route 9W. The two trails that allow
access to Bear Mountain are the Appalachian Trail and the Major Welch Trail. Anyone not familiar
with the area will probably miss the point at which the Major Welch Trail leaves the paved loop
around Hessian Lake. I recommend taking the Appalachian Trail up the mountain the first time and
using the Major Welch to return. Head for the outdoor ice skating rink. As you walk from the rink
to Hessian Lake, a paved trail leads up a hill. This was the access road to the old ski jump which
has not been used for MANY years. Follow the white blazes of the Appalachian Trail as it winds its
way up the mountain. In some spots there are some bare rock faces to climb up at angles over 40
degrees. Some people go around while others go right up the rock. The trail meets a dead end road
with a circle that many people use to view the river valley below. Walk up the road for a short
while watching for a SMALL sign for the tower on your left. As you head up to the tower there are
several opportunities to walk off the trail to a lookout to take in the view. The trail crosses
Perkins Memorial drive several times. You can lose the trail at times but just keep heading for the
tower. The view from the top is very nice on a clear day. Be sure to look south. About two miles
away is Bald Mountain which is also a popular destination for hikers. Walk around the tower clockwise
and down the access road. Walk off to your right and try to find the red blazed Major Welch Trail.
Just after this trail begins there are several spectacular lookouts. The trail then begins a rather
steep descent toward Hessian Lake. This trail also has some open and bare rock faces to negotiate.
There are several additional opportunities for views but none are as good as at the top. Eventually
the trail meets the paved loop trail around Hessian Lake. Turn right for the short way back or turn
left to enjoy a walk around the lake. Make a mental note of where the Major Welch trail meets the path
so that you can reverse the loop next time.
Park in any of the parking lots at the Bear Mountain Inn off Route 9W. The two trails that allow
access to Bear Mountain are the Appalachian Trail and the Major Welch Trail. Anyone not familiar
with the area will probably miss the point at which the Major Welch Trail leaves the paved loop
around Hessian Lake. I recommend taking the Appalachian Trail up the mountain the first time and
using the Major Welch to return. Head for the outdoor ice skating rink. As you walk from the rink
to Hessian Lake, a paved trail leads up a hill. This was the access road to the old ski jump which
has not been used for MANY years. Follow the white blazes of the Appalachian Trail as it winds its
way up the mountain. In some spots there are some bare rock faces to climb up at angles over 40
degrees. Some people go around while others go right up the rock. The trail meets a dead end road
with a circle that many people use to view the river valley below. Walk up the road for a short
while watching for a SMALL sign for the tower on your left. As you head up to the tower there are
several opportunities to walk off the trail to a lookout to take in the view. The trail crosses
Perkins Memorial drive several times. You can lose the trail at times but just keep heading for the
tower. The view from the top is very nice on a clear day. Be sure to look south. About two miles
away is Bald Mountain which is also a popular destination for hikers. Walk around the tower clockwise
and down the access road. Walk off to your right and try to find the red blazed Major Welch Trail.
Just after this trail begins there are several spectacular lookouts. The trail then begins a rather
steep descent toward Hessian Lake. This trail also has some open and bare rock faces to negotiate.
There are several additional opportunities for views but none are as good as at the top. Eventually
the trail meets the paved loop trail around Hessian Lake. Turn right for the short way back or turn
left to enjoy a walk around the lake. Make a mental note of where the Major Welch trail meets the path
so that you can reverse the loop next time.
 (The image at the left shows the profile of the hike. Remember that all vertical profiles are
relative!)
(The image at the left shows the profile of the hike. Remember that all vertical profiles are
relative!)
Bear Mountain: Steps Trail Loop
| Quick Look | ||||
|---|---|---|---|---|
| Difficulty | Round trip | Total climb | Internet Maps | |
| 10.3 miles | 2182 feet | AllTrails | ||
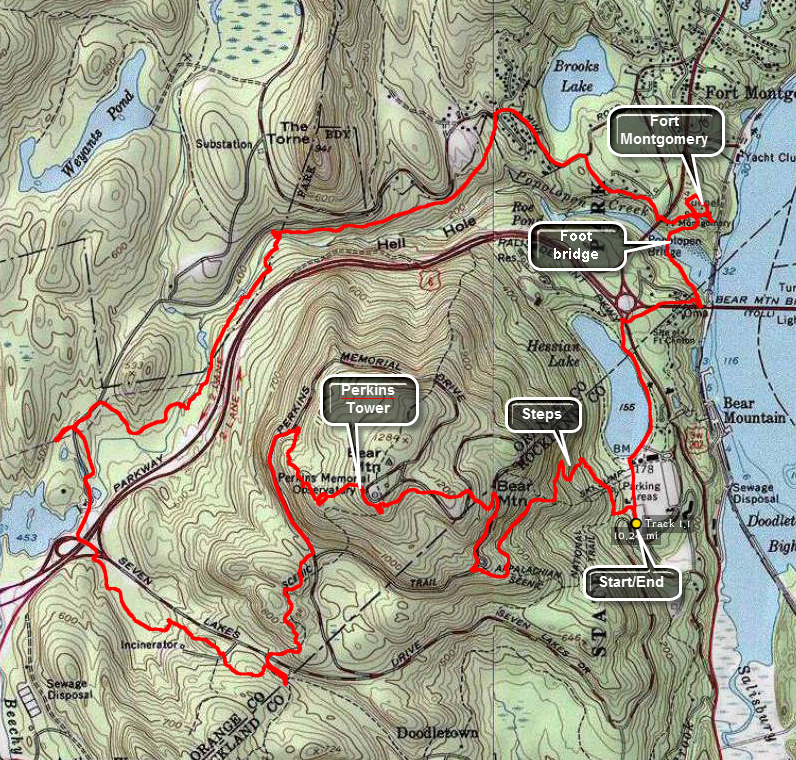 Park in any of the parking lots at the Bear Mountain Inn off Route 9W. The three trails that allow access to Bear Mountain are the Appalachian Trail, the Major Welch Trail and the new Steps Trail. Anyone not familiar with the area will probably miss the point at which the Major Welch Trail leaves the paved loop around Hessian Lake. I recommend taking the Appalachian Trail or the Steps Trail up the mountain the first time. This route uses the Steps Trail and then forms a big loop around the bear Mountain Park.
Head for the outdoor ice skating rink. As you walk from the rink to Hessian Lake, a paved trail leads up a hill. This was the access road to the old ski jump which has not been used for MANY years. At the top of the first climb DO NOT turn left on the road but continue straight ahead to climb the Steps Trail. The "steps" are hundreds of stone steps cut on the mountain and placed by volunteers to alleviate the damage to the ecology from the large volume of visitors to this area. The trail meets a dead end road with a circle that many people use to view the river valley below. Walk up the road for a short while watching for a SMALL sign for the tower on your left. As you head up to the tower there are several opportunities to walk off the trail to a lookout to take in the view. The trail crosses Perkins Memorial drive several times. You can lose the trail at times but just keep heading for the tower. The view from the top is very nice on a clear day. Be sure to look south. About two miles away is Bald Mountain which is also a popular destination for hikers. You may also see West Mountain with its stone shelter. The skyline of New York City can be seen to the south.
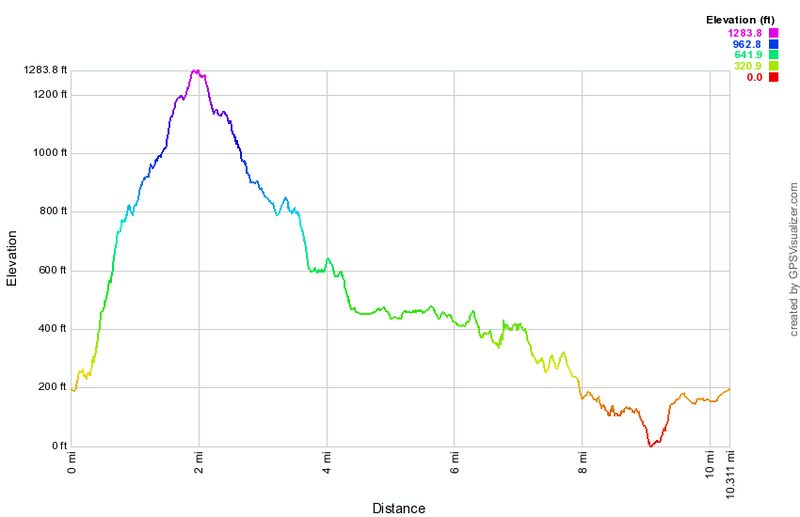 (The image at the left shows the profile of the hike. Remember that all vertical profiles are relative!)
Bear Mountain: The Torne from Popolopen Gorge
| Quick Look | ||||
|---|---|---|---|---|
| Difficulty | Round trip | Total climb | Internet Maps | |
| 6.7 mi. | 1415 ft. | AllTrails | ||
 The easiest place to park to start this hike is at the Bear Mountain Inn parking area next to Hessian Lake. parking costs $6 but there is lots of it and bathroom facilities are available. There area several ways to get to the parking area but Route 9W north or south is the easiest way. You can also take Seven Lakes Drive from Long Mountain Parkway (Route 6). Stay on Seven Lakes Drive through another traffic circle. Park in the back parking area. Walk toward the outdoor skating rink and down the hill toward Hessian Lake. Walk around Hessian Lake on the right or east side. You will be walking north toward the Bear Mountain Traffic Circle. Leave the path and walk up toward Route 9W and the traffic circle. CAREFULLY cross the traffic circle and walk along Route 9W north as it leaves the traffic circle. Watch for three red on white rectangular blazes on the left side of the road. This is the beginning of the Popolopen Gorge Trail.
The P-G Trail more or less parallels Popolopen Creek and the sights and sounds are very pleasing. The trail rises and falls but continuously gains some elevation. At times you are closer to the creek than others. In a short distance is a dam on the creek and the remains of a mill with the millpond behind the dam. As you continue along the trail you will see a rather impressive hill on your right. This is The Torne, the object of the hike. You will also find "manhole" covers at regular intervals. These are access points for the West Point Aqueduct. The noise of traffic competes with the babble of the brook as the trail comes very close to Route 6 in places. On the far bank of the creek a stone "wall" is noticeable. This supports the Timp-Torne, 177 and 1179 trails that you will use on your return. After a little more than a mile, you will be at the junction with the Blue marked Timp-Torne Trail.
Make a left turn at this point and head down toward the creek. Don't worry about finding a way across. There is a brand new metal footbridge. Take some time to enjoy the sights and sounds of the creek before continuing on to the other side. After a slight ascent the trail turns left. The turn is marked but a woods road also goes left. This is typical of the area where trails and woods roads cross each other frequently. Generally the trails are well-marked but a map, compass and GPS can all be VERY helpful. In a short distance the Timp-Torne Trail turns left while the 1777 and 1779 Trails continue straight ahead. Turn left and ascend slightly to Mine Road. Go across the road and find the trail marking on the other side. Now get ready to climb.
The trail up the Torne is steep at times and, in several areas, passes over rock outcroppings with some tricky food and hand holds. CAUTION: Wet, icy and snowy conditions will make this ascent dangerous! The trail follows the pattern of short steep ascents followed by flatter areas for recovery. There are very few workarounds available. As you climb be sure to look around at the views back to Bear Mountain and down to the Hudson River. You can see the Bear Mountain Bridge and Anthony's Nose clearly. Of course, These views are not as good as the ones from the top. Continue on up until there is no more up. At the top of the Torne is a stone cairn. As the sign explains, the stones were all carried form the bottom of the hill to the top to commemorate the sacrifice of soldiers fighting overseas. The cairn is also decorated with many Boy Scout emblems as this is a popular destination for scout troop hikes.
From the top you can retrace your path back to the junction with the 1777 and 1779 Trails. You can also follow the Timp-Torne trail as it makes a sort of loop and continues on another route down the Torne. No matter which path you take you will cross over Mine Road again and meet up with the other trails. You can, of course, retrace your steps to the car but staying on the north side of the creek is a nice alternative. turn left on the Timp-Torne, 1777 and 1779. Notice the stone support beneath the trail that was visible from the other bank. The trail rises and falls on the way toward Brooks Lake. At one point you will come to a road. Turn right and continue on down the road watching for trail markers on the left side. When you turn into the woods you will see Brooks Lake appear almost immediately. This areas was opened in 2005 and is used by residents fro camping and day use.
Continue passed Brook Lake up to a road. Turn left on the road and immediately pick up the trail on the other side. The trail continues to the woods and then leads to another road. Walk down the road and turn back onto the trail on the right. This short trail leads to the West Redoubt of the Revolutionary War era Fort Montgomery. From the Redoubt, return to the main trail and walk UNDER the Popolopen Creek Bridge and Route 9W. After a short ascent, the Fort Montgomery visitor's center will be straight ahead. Take some time to walk around the fort. Only the stone foundations of the buildings remain but placards explain the fort's construction and significance. There are foundations for the barracks, guard house, powder magazine and necessaries. The sight of the North Redoubt and Main Battery are marked. A replicate 32 pound cannon is at the site of the main battery. The views from this area are beautiful and help to explain why a fort was erected at this site. When you are done, walk back to and behind the visitor's center. Walk down a little hill to the creek and an impressive suspension footbridge. From the footbridge there are incredible views of the Bear Mountain Bridge and Anthony's Nose on the left and Popolopen Creek and the Popolopen Creek Bridge on the other.
The trail continues across another much smaller footbridge and up and under the Bear Mountain Bridge. The view from under the bridge is interesting. The trail leads up through the museum and zoo. If these are closed or if you hike with your dog, take the trail to the right which leads up to the toll booths and bypasses the zoo. From here walk west toward the traffic circle and cross over Route 9W to Hessian Lake. Walk back the way you originally came at the beginning of the hike or continue on around Hessian Lake. On the other side look for the red trail markings of the Major Welch Trail that is one of the trails to the top of Bear Mountain. The Appalachian Trail and the Suffern-Bear Mountain Trail also pass through this area. Return to your car on one of the many pathways.
 (The image at the left shows the profile of the hike. Remember that all vertical profiles are
relative!)
(The image at the left shows the profile of the hike. Remember that all vertical profiles are
relative!)
Bear Mountain: The Timp to The Torne with Bear Mountain
| Quick Look | ||||
|---|---|---|---|---|
| Difficulty | Round trip | Total climb | Internet Maps | |
| 14.3 mi. | 4607 ft. | AllTrails | ||
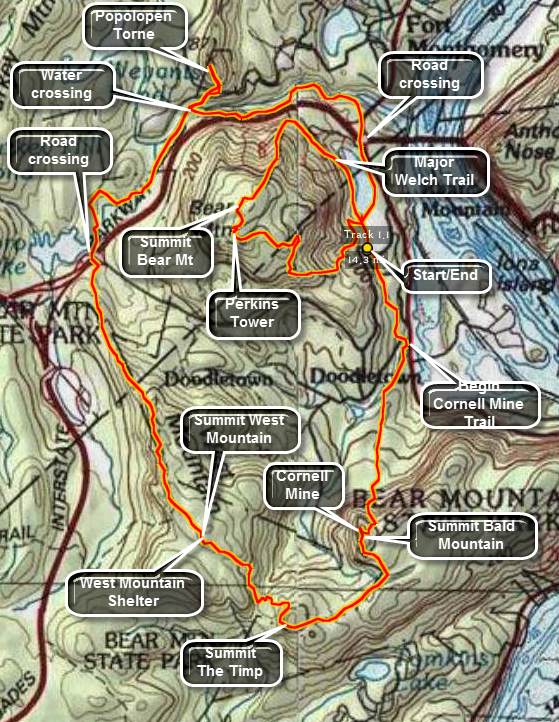 The easiest place to park to start this hike is at the Bear Mountain Inn parking area next to Hessian Lake. Parking costs $7 but there is lots of it and bathroom facilities are available. There area several ways to get to the parking area but Route 9W north or south is the easiest way. You can also take Seven Lakes Drive from Long Mountain Parkway (Route 6). Stay on Seven Lakes Drive through another traffic circle. Park in the back parking area. Walk south toward the tunnel that goes under the road and watch for the red 1777E trail. Stay on this trail until the blue Cornell Mine Trail branches to the left and turn here to walk down to Route 9W. Walk along route 9W for a hundred feet and turn right into the woods along a small stream. You may want to walk down to the stream to tale pictures as there are several small waterfalls. The trail remains relatively flat for about a mile until it starts to climb Bald Mountain. The climb isn't too long and a few switchbacks make the trip easier if a little longer. In about .33 miles you will be at the end of the Cornell Mine Trail. Turn right on the red Ramapo-Dunderberg Trail and walk to the summit of Bald Mountain. At the summit there is a large open self of rock that has great views to the north of the Bear Mountain Bridge and West Mountain with its stone shelter. When you are done, walk back to the trail and head south.
The descent down Bald Mountain is steep in places and runs across some open rock but in manageable. At times you are surrounded by huge blocks of rock. Stay on the trail as it turns southwest and ignore the junctions with the red 1777 trail after about .7 miles. In another .2 miles turn right on the blue Timp-Torne Trail and ascend to the top of The Timp. From the top of The Timp there are nice views of Bald Mountain and Tompkins Lake below. On clear days you may also be able to see the New York City skyline. Leave The Timp and continue on the blue trail as it descends The Timp into the area between it and the West Mountain ridge. The climb up to West Mountain is steep at times but isn't very long. In about .8 miles you will be near the highest point and will arrive at the West Mountain shelter. The shelter is very busy during peak hiking times and is well-constructed out of stone. From here you can look back at The Timp and also have a chance to get another view of the city skyline. Take some pictures and then continue on the blue trail passing two trail junction with the yellow Suffern-Bear Mountain Trail. In about .35 miles the Appalachian Trail comes in from the left and runs along with the Timp-Torne Trail for some distance.
Continue on the ridge along the blue trail. There are nice views to the left including some down to the Anthony Wayne State park parking lots. Soon the AT breaks to the right and the trail travels along a rocky ridge before descending over some open rock. You will pass the junction with the red Fawn Trail and the white Anthony Wayne Trail. The Timp-Torne Trail then intersects Seven Lakes Drive which you must cross with EXTREME caution. This is about 2 miles from the West Mountain shelter. Cross Seven Lakes Drive and walk along the opposite shoulder and over the overpass. Cross to the other side of the road and head down the paved path toward Queensboro Lake. This paved road soon turns to dirt and then in about .4 miles a sign warns "Shooting Range"! At this point the trail turns right and you should follow it.
The trail roams through some woods and crosses a stream on a narrow "bridge" before paralleling the stream on the high bank. In about a mile it turn to the left and crosses a stream on a well-constructed bridge. From here the trail ascends some stone steps, turns to the right, follows a woods road and then turns left up a hill. It crosses Mine Road and then begins a series of switchbacks up to The Torne. From the bridge it is about .25 miles to the beginning of the ascent up The Torne. This ascent is STEEP and passes over several areas of open rock with little to hold onto and not much good footing. One area requires you to make a choice of making it up a 60 degrees sloping rock or up and over a 4 foot drop. Trying to ascend and descend The Torne when it is wet or icy is a recipe for disaster. The ascent is only about .2 miles. Just before the summit is a viewpoint that looks down over the Hudson and the Bear mountain Bridge. To the right Bear Mountain is visible. At the summit is a 5 foot rock cairn. The rocks were carried from the bottom of the hill to the top to commemorate soldiers killed in Iraq and Afghanistan. When you are done, retrace your oath back to the bridge and walk back up to the main trail.
Turn left on the red Popolopen Gorge Trail which parallels the creek high on the bank but eventually drops almost to water level. Near the end of this trail is an old mill dam which holds back the creek and forms a pleasing waterfall. After 1.3 miles, the trail ends at Route 9W. Cross the road carefully and turn right and walk up to the traffic circle. Find the best way to continue across the circle and to the walkway around the lake. You may turn left and return to the car or continue on around the lake to ascend Bear Mountain. If you do want to go up the mountain, turning right may be a better idea. The walk to the head of the lake is about .5 miles. Turn right here to continue around the lake. Around .3 miles watch for the red blazes of the Major Welch Trail as they turn left into the woods.
The Major Welch trail starts out mildly but quickly becomes steep and ascend over some open rock. One place is so steep a chain is provided to help pull yourself up. After .8 miles of some serious climbing, the trail crosses Perkins Drive and continues to climb to the summit of Bear Mountain. Along the way are several fantastic viewpoints that look down on the river and the bridge. In about .5 miles the trail passes the Perkins Tower to another excellent lookout. After taking in the views, walk to the left and look for the white blazes of the AT that you will follow back to the lake. The trail weaves back and forth, reaches a dead end road to a circular parking area and then continues its descent down the mountain. Continue to follow the trail and in about 1.35 miles you will be a the top of a downhill that lead back to the lake. Walk down the hill and take a right at the bottom of the hill. Walk passed the ice rink to the parking lot and your car.
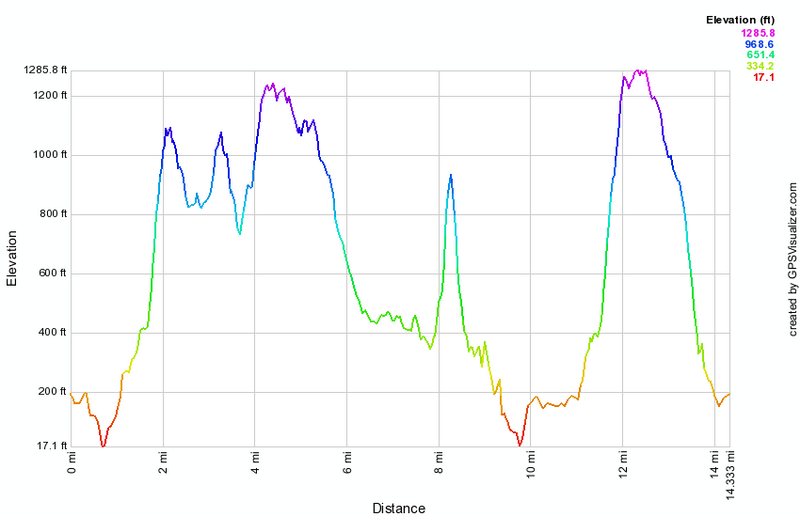 (The image at the left shows the profile of the hike. Remember that all vertical profiles are relative!)
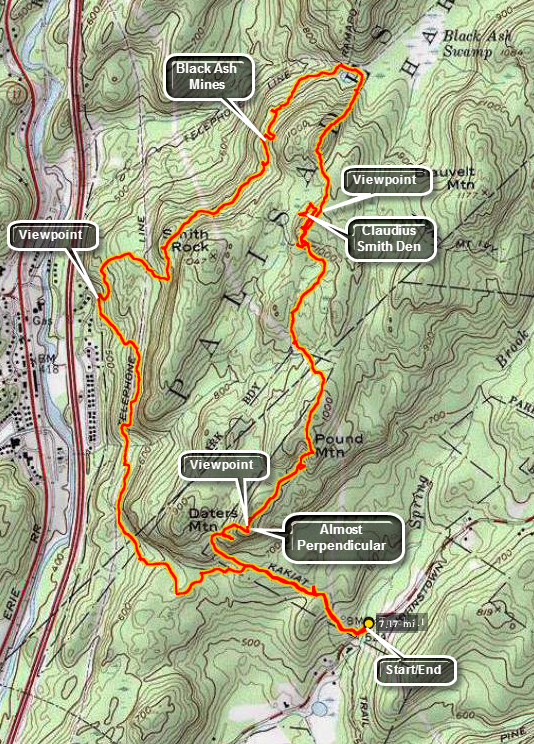
Harriman: Almost Perpendicular and Claudius Smith Den
| Quick Look | ||||
|---|---|---|---|---|
| Difficulty | Round trip | Total climb | Internet Maps | |
| 7.3 mi. | 1926 ft. | AllTrails | ||
Take Seven Lakes Drive southwest from the Long Mountain traffic circle near Bear Mountain. Pass through the Tiorati Circle staying on Seven Lakes Drive until the Reeves Education Center appears on your left. Take the next right and immediately turn right again onto Johnsontown Road. Park on the edge of the traffic circle at the end of the road.
Walk back toward the road from the traffic circle and look for the blue disc trail. The blue disc trail turns up the hill to the northwest just before entering the traffic circle. The first part runs along the access road for maintenance of a gas pipeline. The trail then cuts into the woods and parallels the pipeline briefly before heading more northwest. After about .85 miles of hiking a high rock formation appears on the left. You may go off the trail and up to the lookout where there are limited views. Back on the main trail continue to hike and almost immediately you will hit a very steep little climb which is hardly perpendicular! The top is about 960 feet in elevation and only a mile from the start of the hike. It offers excellent views particularly to the south and east. Continue your hike down from the viewpoint into a little "valley" surrounded by several high rock formations. The trail then ascends Pound Mountain and descends again as it approaches Elbow Brush at about 1.9 miles. Elbow Brush is a narrow passage between the bedrock and a piece that has pulled away over the years. This area can be avoided in one of several ways but it is interesting and not all that narrow. In this area there are other jumbles of rocks with some places to walk through. Continue to hike to the junction with the Tuxedo Mount Ivy Trail. This trail runs roughly east-west but you want to continue on the blue disc trail. The blue discs may be hard to find as they proceed straight ahead and directly up the rock face to another viewpoint at 2.3 miles. Just across on the next hill you can see Smith's Rock but it is hard to determine where Claudius Smith's "den" is located. To get to the "hideout", go back to the trail junction and take the red Tuxedo Mt Ivy trail west to the base of the cliff that forms the lookout. You will would find the "den" there within a few hundred feet. It first appears as an opening on the right of the trail. You can walk into this "cave" and make your way to the other side. Back on the trail walk to the base of the cliff to find the rest of the den in the form of a rock overhang. There is a fire pit here. Smith was raised in Brookhaven on Long Island but his family moved to Smith' Clove (Monroe) in the early 1740's. His family was well-respected and when war broke out many became Loyalists. Claudius led a band of men who defended the Loyalists in Orange County and attacked the rebels. Eventually he became so notorious that Governor George Clinton offered a $1200 reward for his capture. Claudius Smith was hanged in Goshen, NY in 1179 as were two of his sons. After inspecting the den and rock formations, go back up to the blue disc trail. You will pass by a large rock that appears to have primitive petroglyphs painted on it. The scene depicts hunters with weapons attacking some animal with a series of trees in the background. On closer inspection the work looks more modern than ancient. Finding the blue disc trail after the lookout can be difficult. Walk down the open rock face watching for the markings which head off slightly to the right. There are only a few faded blazes on the rock. The trail starts to descend after crossing over another viewpoint and at about 3.4 miles start to look for the junction with the Victory Trail marked with blue V's. Turn left or west and hike a short distance to the trail junction with the Ramapo Dunderberg Trail heading southwest. This is relatively flat between some hills on the east and a drop off to the west. Begin looking for some evidence of the Black Ash mines like the tailings piles. At about 4.0 miles you will notice a tailings pile to the left of the trail. Walk up to it and find one of the openings for the Black Ash mine just behind it. The adit is flooded but still interesting. Walk down to the trail and continue south and find a second adit to the Black Ash mine very near the trail on the right. The trail continues to be open and easy to follow and at 4.7 miles there is a nice viewpoint down to Tuxedo and the Thruway. This lookout also has views to the hills beyond. The trail begins to descend as it approaches Tuxedo Park and the Thruway. Just after descending to a small parking area, turn left or south-southeast on the white Kakiat Trail which will help you complete the loop back to the blue disc trail and the car. The Dater Mine is near the trail junction with the blue disc trail. The Kakiat Trail follows a woods road and immediately begins to ascend to an old telephone line right-of-way. The ascent is only about .3 miles and about 200 feet. As you near the junction with the blue disc trail various paths and roads lead up the mountain toward the direction of the Dater Mine. From here it is only .2 miles to the blue disc trail and .7 miles back to the car.
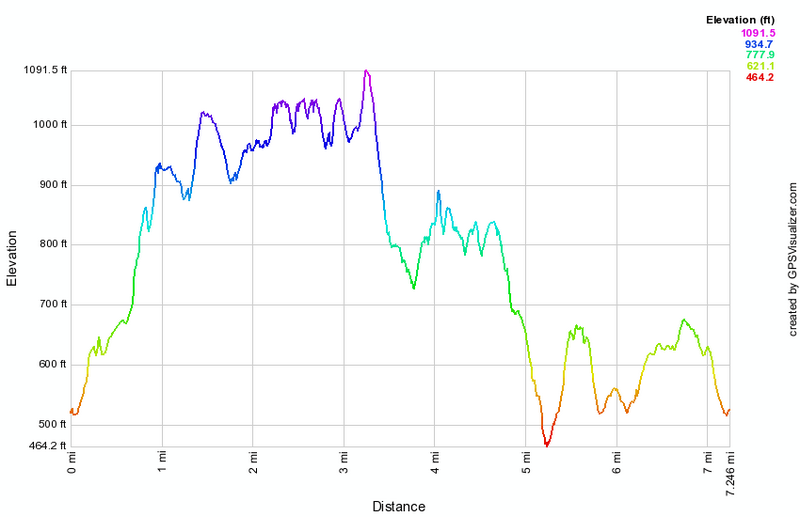 (The image at the left shows the profile of the hike. Remember that all vertical profiles are relative!)
Harriman: Anthony Wayne Loop
| Quick Look | ||||
|---|---|---|---|---|
| Difficulty | Round trip | Total climb | Internet Maps | |
| 5.9 mi. | 1540 ft. | AllTrails | ||
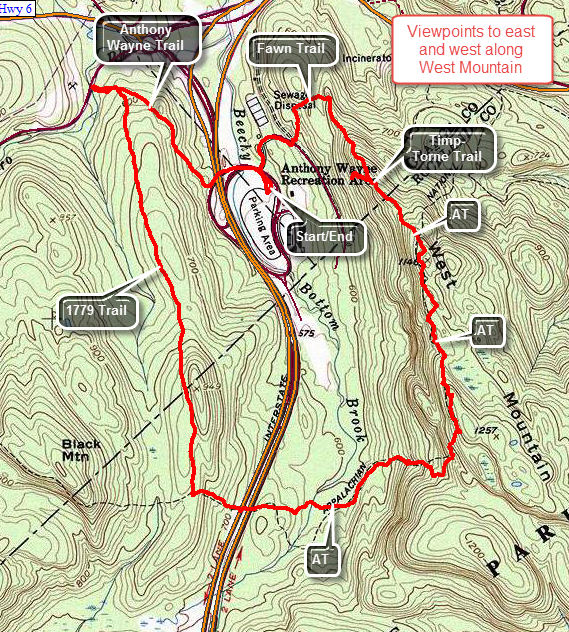
Take the Long Mountain Parkway to the Long Mountain traffic circle. From there get on the Palisades parkway south for one exit south to the Anthony Wayne Recreation Area. Pay the entrance fee if it is the season and park in the large parking area.From the car walk back to the bridge over the parkway where you will see white marking for the Anthony Wayne Trail. The trail soon cuts right or north into the woods. Followed it as it gains some elevation to about .6 miles. Watch for the blue blazed 1779 Trail on your left as you start to descend. It may be hard to spot as the disks are faded and there is no sign to call your attention to the trail. Over the next mile or so the trail keeps gaining some elevation but really seems quite flat. At 2.1 miles the trail begins to descend and at about 2.4 miles you will be at the junction with the AT where you should turn left. The trail now descends until it crosses the Palisades Parkway.Once on the other side continue to lose elevation until about 3 miles when the trail begins to ascend the West Mountain ridge. The ascent is about 600 feet in the next .7 miles. Some parts of the trail are steeper than others but there are several switchbacks to help make the trip easier if not shorter. Continued climbing until we you are near the top of the ridge. and watch as the AT markings go to the left with little notice. Turn north or left and follow the AT which is also marked with blue blazes in this area for the Timp-Torne Trail. On a nice day, it is worth the side-trip to head south to the West Mountain Shelter which offers a great view toward the south on the Hudson River. On a good day the New York City skyline is clearly visible. As you hike north along the ridge, there are many views to the west and several opportunities to get a view east as well. The views to the west are mostly of forest but the views to the east and north include a few peeks at the river and Bear Mountain. As you continue north the Perkins Tower on Bear Mountain becomes more and more prominent. You will begin losing elevation and at about 4.5 miles the AT heads to the right. Stay to the left on the blue trail. Continue north and begin to look for the Fawn Trail marked with a red F. At one point the trail becomes very narrow requiring you to slip between some rocks. Just after this you will have to descend over an open rock face. Just below this is the trail intersection with the Fawn Trail back to the Anthony Wayne Recreation Area. Follow this trail as it continues down off the ridge. Eventually the trail crosses some of the woods roads associated with the park and within a few minutes you will be back at the road that leaves the park. Cross the road and walk over to your car.
 (The image at the left shows the profile of the hike. Remember that all vertical profiles are relative!)
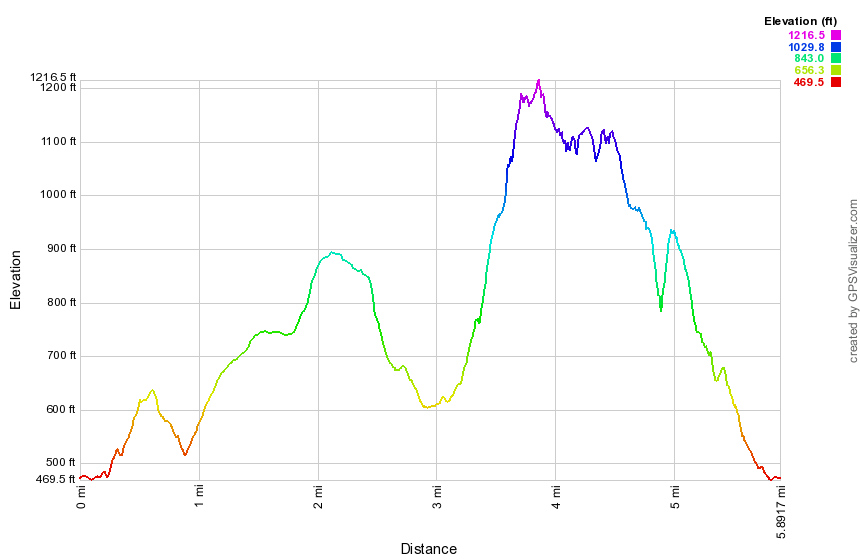
Harriman: Boston, Garfield, Greenwood, Surebridge Mines
| Quick Look | ||||
|---|---|---|---|---|
| Difficulty | Round trip | Total climb | Internet Maps | |
| 10.6 mi. | 1825 ft. | AllTrails | ||
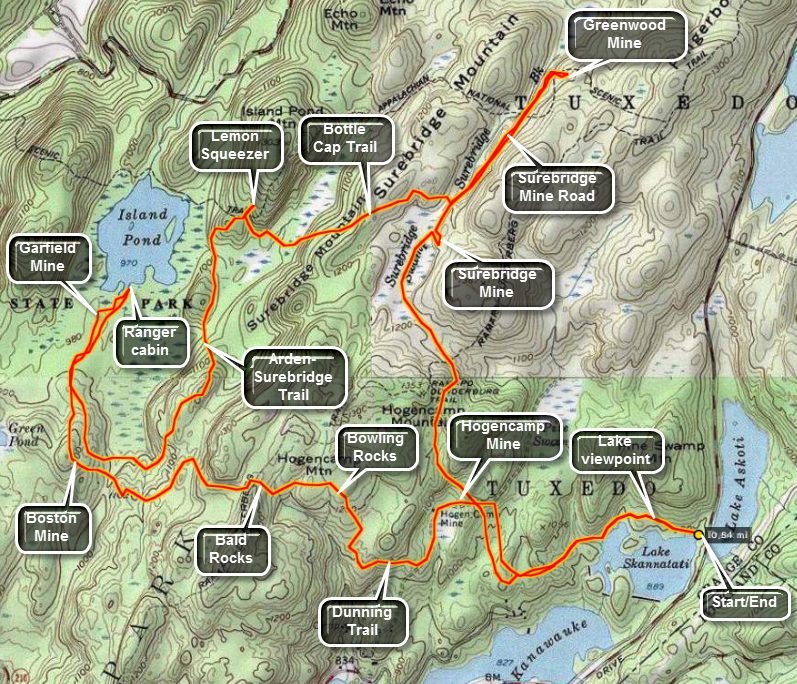
Take Seven Lakes Drive southwest from the Long Mountain Circle near Bear Mountain. Pass through the Tiorati Circle staying on Seven Lakes Drive. Just passed Lake Tiorati there are two lakes, one on each side of the road. These are Lakes Askoti and Skanatati. Pull into the parking area on the right next to Lake Skanatati. This lake is larger than it looks as you will see when you hike along the shore and see it from above. The trails start to the right of the lake. Bear to the left on the Long Path marked with aqua paint. As you walk along this path there are several opportunities to walk down to the lake to get a better view. After following the shoreline of the lake the Long Path continues west and then turns north. At 1.1 miles the Long Path meets the yellow marked Dunning Trail.
Bear left on the Dunning Trail past the workings of the Hogencamp Mine on the right. There is a swamp on the left and some tailings from the mine. The trail ascends a hill to an area that overlooks Little Long Pond. Continue up the hill to a long flat area of bedrock. There are several large boulders lying on the flat area. these are called the Bowling rocks. The trail winds down and up until it meets the Ramapo-Dunderberg Trail after about 1.2 miles. Just to the left up the RD Trail is the area known as the Bald Rocks. The exposed bedrock in this area has interesting striations. Continue on the Dunning Trail through this area.
In .25 miles the Dunning Trail meets and runs concurrently with the White Bar Trail for another .25 miles. At this point turn right to stay on the Dunning Trail. Stay on the Dunning Trail and in about .3 miles begin to look for mine tailings. This is the Boston Mine. There are two surface pits with their associated tailings. To find the Island Pond Road walk north or slightly northeast until you see the red triangles that mark the Arden-Surebridge Trail. Turn left on this trail and follow it until it meets the road. After several hundred feet the ASB Trail turns left. Continue on the road until it forks and take the left fork. The road appears to end but work your way through the laurel until you are almost at the lake shore. Here you will find an exploratory pit and a water filled trench. There are also some tailings from the Garfield Mine. Walk back out to where the road forks and take the right fork. This part of the road ends on the shore of Island Pond. The pond is beautiful and the ruins of an old stone ranger station can be found here.
Turn around and take the road back to where the ASB Trail meets the road. Turn left onto the trail. this trail heads southeast and then turns northeast as it heads toward the Lemon Squeezer about 1.6 miles away. The trail initially is relatively flat but then climbs to the top of a ridge. From here it goes up and down until the Lemon Squeezer. Stop here an spend some time investigating the lemon Squeezer. The AT ascends through this area but you will be returning to the ASB Trail after finishing at the Lemon Squeezer. Continue on the SB Trail and the Long Path for about .25 miles until the Bottle Cap Trail leaves to the left. The Bottle Cap Trail is marked by bottle caps nailed to the trees. The trail immediately ascends to the top of Surebridge Mountain. Continue on the trail over the top of the ridge and down the other side to a wet area to find the Surebridge Mine Trail. The total distance on the trail is about .6 miles and a stone cairn marks the road.
Turn left on the road and walk .6 miles to the Greenwood Mine. Watch for the white blazes of the AT on the right and almost immediately after that the tailings of the mine on the left and a mine opening on the right. The opening is filled with water. Continue on the trail to find another trench on the right. Turn right and walk up the hillside. Wander around looking for mine tailings. Above the mine tailings there will always be a mine working of some kind. The Greenwood mine has several trenches some with underground openings. Return to the road and walk .6 miles back to the Bottle Cap Trail junction. Stay on the mine road and watch for the first workings of the Surebridge Mine on the left. Walk off the trail to the left. There are several piles of tailings. Look for three different trenches at least one of which appears to extend underground. There are several exploratory pits and one deep shaft. The shaft is vertical but seems to turn horizontally at the bottom. Most of these workings are filled with water. Return to the mine road.
After .35 miles you will join the ASB Trail and the Long Path and the trail junction called Times Square. Find the Long Path and walk .4 miles over the hill to the Hogencamp Mine. Another .4 miles takes you to the Dunning Trail Long Path junction where you began the loop earlier in the day. Walk 1.1 miles back to the parking area.
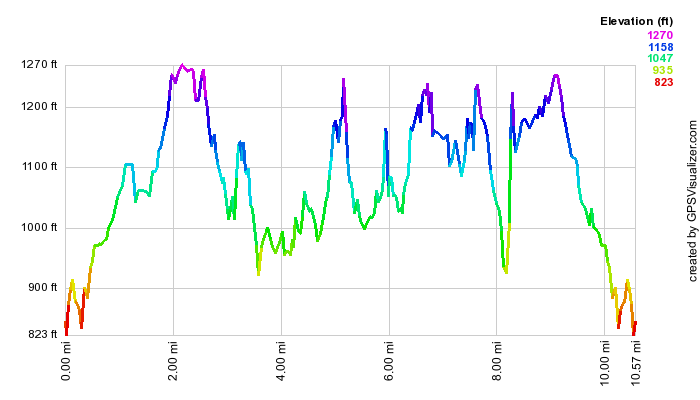 (The image at the left shows the profile of the hike. Remember that all vertical profiles are
relative!)
(The image at the left shows the profile of the hike. Remember that all vertical profiles are
relative!)
Harriman: Bradley Mine
| Quick Look | ||||
|---|---|---|---|---|
| Difficulty | Round trip | Total climb | Internet Maps | |
| 2.8 mi. | 800 ft. | AllTrails | ||
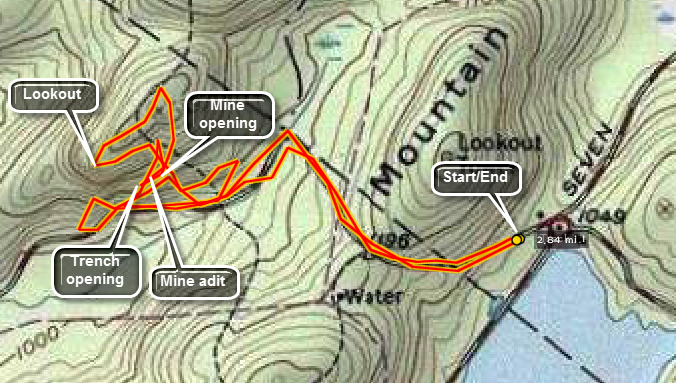
Take Seven Lakes Drive southwest from the Long Mountain Circle near Bear Mountain. Drive 3.7 miles and park at the Lake Tiorati parking area. Walk up to Arden Road which is closed during the winter. Walk on the road for .5 miles where the Long Path crosses the road. The road turns ninety degrees to the left at this point. Walk another .3 miles along the road and watch for a woods road that cuts up and to the right. Walk up the road and the entrance to the Bradley Mine cut will appear directly ahead. Walk into the cut to the end where the actual entrance to the underground is located. The mine is usually filled with water. It is possible to enter this cavern during the dry season. Notice the air shaft up and to the right. Walk back out through the cut and around the opening to the left. Walk up the hillside to find the opening to the air shaft. You can now wander over the hillside and up to the top of the hill. There are not too many additional evidences of mining activity. A large, flat work area is evident at the top and there is a nice view to the west. After looking around, retrace your steps to the road. Walk to road back to the car.
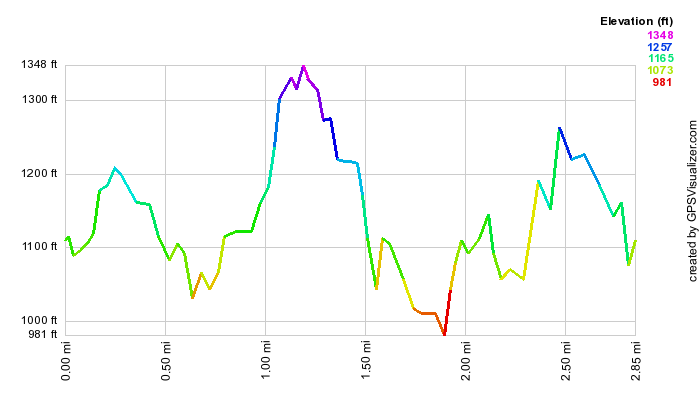 (The image at the left shows the profile of the hike. Remember that all vertical profiles are
relative!)
(The image at the left shows the profile of the hike. Remember that all vertical profiles are
relative!)
Harriman: Cranberry, Spanish, Silver, Lewis Mines
| Quick Look | ||||
|---|---|---|---|---|
| Difficulty | Round trip | Total climb | Internet Maps | |
| 7.8 mi. | 1477 ft. | AllTrails | ||
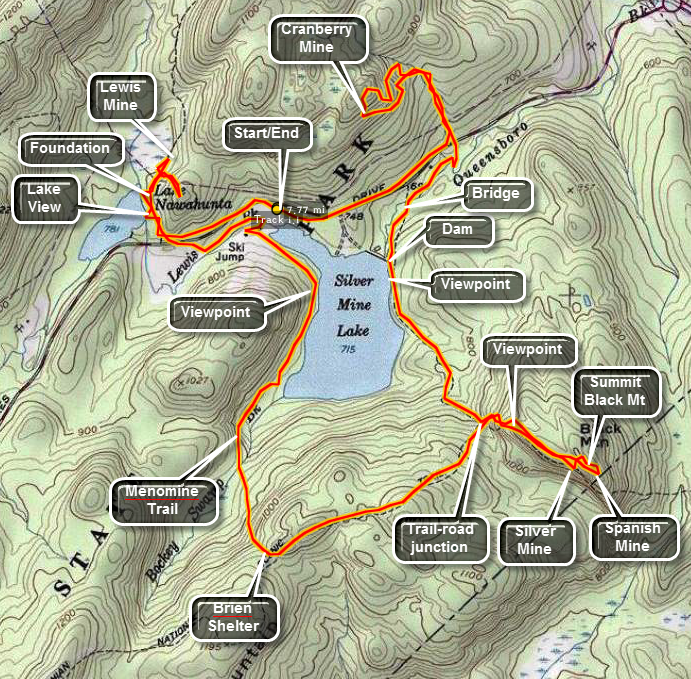
Take Seven Lakes Drive southwest from the Long Mountain Circle near Bear Mountain. Drive 1.5 miles and park at the Silvermine Lake parking area. Walk about .5 miles northeast back up Seven lakes Drive. Just after an abandoned comfort station on the right is a brook that runs under the road. Turn left and walk up the left side of the brook. You may see an informal path where other hikers have walked but no specific trail exists. In .3 miles a woods road runs east-west. Turn left or west and walk a short distance to find the opening of the Cranberry Mine. The mine extends into the hillside for almost 100 feet. The adit has been walled up and an iron door once blocked the entrance. You may walk into the mine but it is VERY dark and a good light is a must! On the floor of the mine is the a single gauge railroad track used for ore carts.
Walk back out the entrance and head slightly northeast to find an iron door in front of a corrugated tin roof. This may have been a powder magazine or storage facility. Walk up the hillside and look for other piles of mine waste. There are at least two other shallow trenches and one air shaft. After investigating the mine workings, walk back down the mine road to the brook and back out to the road. Cross the road and follow the woods road to the bridge over the stream. This is the Silvermine Ski Road. Continue on the road for 1.1 miles to the junction with the AT and Ramapo-Dunderberg Trail. Along the way you can visit the dam at the outlet of Silvermine Lake and there are several nice viewpoints for the lake.
Turn left on the trail and get ready for a short but steep ascent of Black Mountain. After the first part of the ascent there is a nice lookout over Silvermine Lake. Continue on the trail to the top of the mountain about .4 miles away from the trail junction. The summit of Black Mountain has a nice view of the Hudson River and of the Perkins Tower on Bear Mountain. Look for piles of tailings and a small, deep pit which is the Spanish Mine. Walk back up the hillside parallel to the trail to find another pile of mine waste and another pit or trench. Get back on the trail and descend the steep rock outcropping. At the base of this outcropping look for a path around to the other side of the rock face. The footing here is difficult. Walk along and look at the rock face. After a short distance, you will see a hole blasted into the side of the mountain with a small amount of mine waste below it. This is the Silver Mine although silver was probably never the object. Return to the main trail and hike back down black Mountain to the junction of the ski road and the AT and RD Trails.
Continue on the trails up and down over some varied terrain. After .8 miles, descend a rock area to the William Brien Memorial Shelter. This is a rock shelter with four wooden bunk beds. Turn right onto the yellow blazed Menomine Trail which winds its way back to the parking area along the western shore of Silvermine Lake. After 1.6 miles, you will be back to the Silvermine Lake parking area. Continue to follow the Menomine Trail through the parking and picnic areas to Seven Lakes Drive. Cross Seven lakes Drive and continue on the trail for .2 miles until it starts around Lake Nawahunta. Bear right on the Nawahunta Fire Road and watch for the opening to the Lewis Mine on the right opposite a swamp on the left. The trench that forms the Lewis Mine extends a short distance into the hillside. Back at the trail-road junction there is a stone foundation on the lake side of the trail. It is not clear what this may have been but its structure suggests it was a storage building. Walk back out to the road and return .4 miles to the parking area.
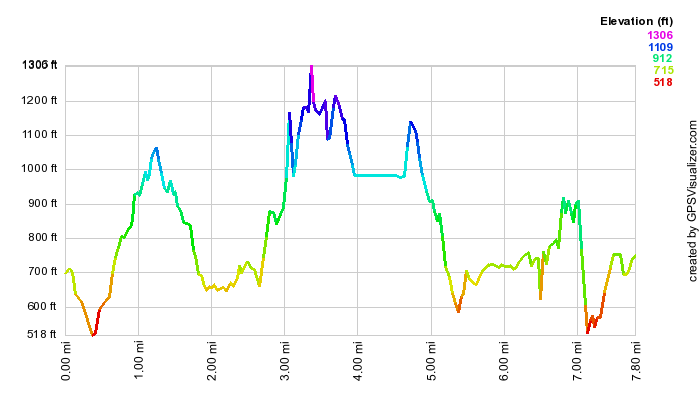 (The image at the left shows the profile of the hike. Remember that all vertical profiles are
relative!)
(The image at the left shows the profile of the hike. Remember that all vertical profiles are
relative!)
Harriman: Doodletown and The Mines
| Quick Look | ||||
|---|---|---|---|---|
| Difficulty | Round trip | Total climb | Internet Maps | |
| 6.3 mi. | 1850 ft. | AllTrails | ||
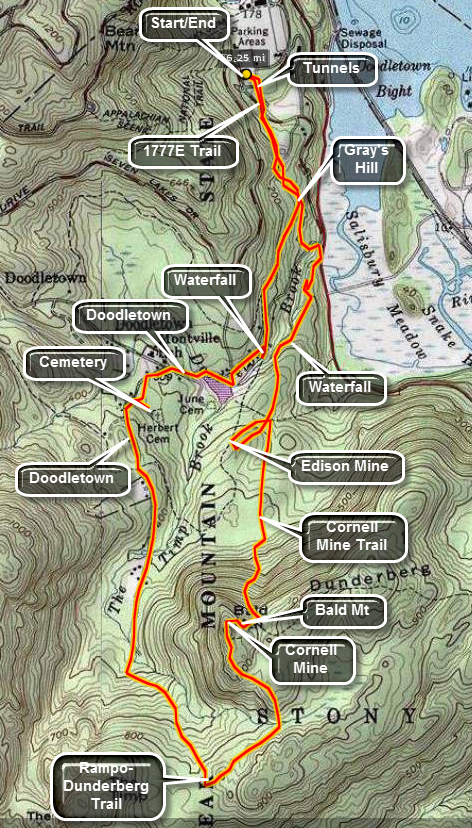 The easiest place to park to start this hike is at the Bear Mountain Inn parking area next to Hessian Lake. Parking costs $6 per car but there is lots of it and bathroom facilities are available. There area several ways to get to the parking area but Route 9W north or south is the easiest way. You can also take Seven Lakes Drive from Long Mountain Parkway (Route 6). Stay on Seven Lakes Drive through another traffic circle. Park in the back parking area. Walk toward the "tunnel" that goes under Perkins Drive. Bear to your right and head towards the other tunnel. Before entering, look at the sign which shows the settlement of Doodletown. These signs occur several times along the 1777 Trail that goes through this late 19th and early 20th century site. The building sites are all numbered, a plaque has been placed near all the major sites and some include an explanation and sketch of the building All the remaining buildings were razed in 1957 so that all that remains are the stone foundations, stone steps and the cemeteries. Enter the tunnel and get on the 1777E Trail.
After .5 miles on the 1777E Trail, you will reach the junction of the red blazed 1777 Trail to the right and the blue blazed Cornell Mine Trail to the left. Bear right onto the 1777 Trail. In another, .5 miles a sign pointing to the left indicates a path to a swimming hole and waterfall. Only a few hundred feet down this path is a bridge over a small stream. There is a nice cascade here with rapids and a deep pool at the base of the falls. The path continues but turn around after enjoying the babbling brook and return to the main path. All of the "trails" here are wide woods roads and some show signs of pavement. Back on the main path you will begin your walk through the Doodletown settlement. The first site is the foundation of the Steinman home. Further down the path is the area were the old schoolhouse stood on the right side of the trail. On the left side is a man made pond.
Continue up the road following the red dot on a white rectangle markings of the 1777 Trail. Where the trail bears to the left is the site of the Siegel home. Further up the road are the steps of the Dunkel house on the right. A little further up the road on the left is the lane that leads to the Herbert/Weyant cemetery. This is about .6 miles from the trail junction and the waterfall path. Many of the grave markers have the names of the members of these two prominent families. Walk back out to the main trail and continue on up the hill. There are numerous home sites marked by stone pillars, foundations or simple signs. As you continue on the road, you will see the outline of Bald Mountain on the left. The mountain looks steep and uninviting at first, however, the trail that you are on wraps around to the more gentle ascent on the opposite side. After walking up another small hill the signage indicates the end of Doodletown settlement. The wide and open road reverts to more of a trail but is still relatively easy walking.
After 1.4 miles from the cemetery lane the red blazed Ramapo-Dunderberg Trail crosses the 1777 Trail. Turn left here and be prepared for a path that is more of a trail; narrow and with more elevation changes. Soon you will be climbing Bald Mountain. The trail initially climbs a small rock outcropping and then descends into a hardwood forest and crosses a small stream. It then ascends to another higher point before dropping a little. The trail then begins the climb up Bald Mountain. Near the summit the trail undulates some before arriving at the summit. The summit is about .7 miles from the junction with the 1777 Trail. The views from the summit are magnificent. The Perkins Tower on Bear Mountain is clearly visible. The Hudson River lies below with the Bear Mountain Bridge, Anthony's Nose, Mount Taurus, Storm King and Breakneck Ridge to the north. From this point you can get back on the R-D Trail and follow it to the junction with the Cornell Mine Trail or you can walk north over the "edge" of Bald Mountain to look for the Cornell Mine.
To find the Cornell Mine walk north down the slope of the mountain and head slightly right or east. Look for many small to medium sized rocks in a pile. These are tailings from the iron mines. Many of these rocks will show "rust". You may find several open pits and gashes cut into the hillside. These are part of the mining complex but a more interesting mine is to be found. Further down the slope is the main entrance to the Cornell Mine which is cut directly into the bedrock of the mountain. The tailing from the mine lie below it on the slope. The mine adit is usually filled with water except in the driest times. The tunnel appears to be block just a short distance into the mine. After exploring, continue east along the slope looking for the red markings of the R-D Trail or the blue ones from the Cornell Mine Trail. If you hit the R-D first, turn left and continue down until the Cornell Mine Trail branches to the left.
Be careful as you descend the Cornell Mine Trail. The initial descent is steep and strewn with rocks some of which are covered by leaves. This can be a slippery, unstable situation leading to falls and injuries. The rocks grow into boulders lower down the trail until it flattens and the trail widens and passes through hardwood trees. After about .85 miles, there is a junction with a woods road . On top of a hill on your left is ANOTHER mine. Walk over toward this hill. If you skirt the top of the hill to the right, you will see the mine tailings. Walk to the top of the hill and look for a depression in the earth. This is not just a pit but a shaft sunk into the rock. The Edison is Thomas Edison who experimented with magnetically separating the iron from the ore. This "loop" is about .3 miles. Walk back to the trail and continue toward Route 202.
In about .5 miles the trail passes very close to Doodletown Brook and an area where there is a nice waterfall and swimming hole. In fact, this is the SAME place you were and the beginning of the hike but you are on the other side of the brook. Walk down to the brook to get a better look at the water. There are several areas of rapids and a man made dam. After exploring some, return to the trail. Route 202 is just .1 miles further down the trail. Just before the road is another nice section of rapids. At the highway turn left and walk a short distance on the left shoulder before turning left and continuing on the Cornell Mine Trail. Climb Grays Hill which was once part of the King's Road and then the Albany Road. Follow the blue trail markers as the trail turns off the paved path to the right and heads up through some brush. This part of the trail is often wet! In .25 miles you will be back at the junction with the 1777E trail where you were earlier tin the day. Continue straight ahead to retrace your steps through the tunnels and to the parking area only .5 miles away.
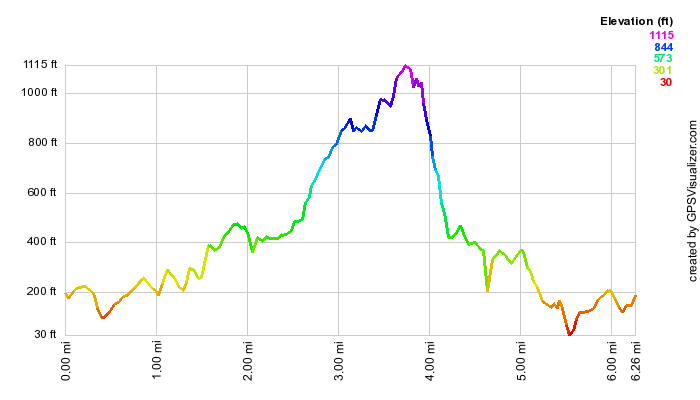 (The image at the left shows the profile of the hike. Remember that all vertical profiles are
relative!)
(The image at the left shows the profile of the hike. Remember that all vertical profiles are
relative!)
Harriman: Dunderberg Mountain Loop
| Quick Look | ||||
|---|---|---|---|---|
| Difficulty | Round trip | Total climb | Internet Maps | |
| 6.7 mi | 2200 ft | AllTrails | ||
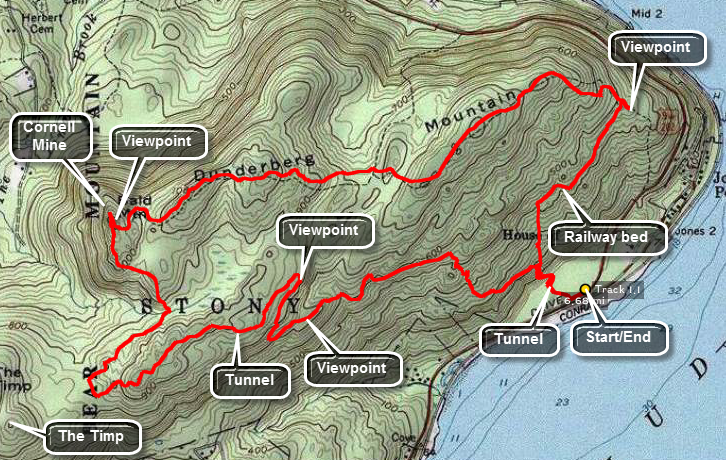 The parking for the trail head is on Route 9W about a mile south of the junction with Route
202. It is just north of the Anchor Monument on 9W. Once parked walk south on 9W for a short
distance. Watch for a small stake with blaze markings. The blazes should be blue for the
Timp-Torne Trail and a red circle on a white background for the Ramapo-Dunderberg Trail.
Be prepared to ascend a steep grade up to the first level of the Dunderberg Ridge. Watch
for a small laid stone tunnel on your left just as the steep climb begins. As you climb you
will begin to get some nice views of the Hudson River, the towns that line it and the power
plants that use the water for cooling. These views are nice but nothing compared to the ones
you WILL get as you ascend to the top of the ridge.
The parking for the trail head is on Route 9W about a mile south of the junction with Route
202. It is just north of the Anchor Monument on 9W. Once parked walk south on 9W for a short
distance. Watch for a small stake with blaze markings. The blazes should be blue for the
Timp-Torne Trail and a red circle on a white background for the Ramapo-Dunderberg Trail.
Be prepared to ascend a steep grade up to the first level of the Dunderberg Ridge. Watch
for a small laid stone tunnel on your left just as the steep climb begins. As you climb you
will begin to get some nice views of the Hudson River, the towns that line it and the power
plants that use the water for cooling. These views are nice but nothing compared to the ones
you WILL get as you ascend to the top of the ridge.
The trail splits at the top of the short ascent. The blue blazed Timp-Torne trail goes left while the red blazed Ramapo-Dunderberg Trail heads off to the right. Both the trails parallel or cross railway beds that are the remains of an aborted spiral railway from the late 1890's. Although it was never completed much of the work that was done is still visible. Turn left an follow the blue blazes. This trail alternates flat sections along the railbed with steep but short climbs up to the next level of the ridge. Several areas have switchbacks to make the climbing easier. There are also several rock scrambles which keep things interesting. As you hike, keep a lookout for the tunnel entrance blasted into the mountain's rock. It will be on your right and is unmistakable. It was never completed and is a dead end. Just passed the tunnel is a great example of how the railway bed was built up and leveled off. After ascending to the highest point on the one side of the ridge the trail drops a little before the climb up to The Timp. The views from here are excellent to the south, west and north. Almost directly west is West Mountain. Look carefully to spot the West Mountain Shelter. From this point there are several options that vary slightly in distance and difficulty.
The first option is to turn around and return the way you came to the low area where the 1777 trail crosses the Timp-Torne Trail The 1777 trail crosses at the lowest point in the area. Turn left onto this trail and walk for a VERY short distance. Keep a lookout for the red blazed Ramapo-Dunderberg Trail on the right.
Another option is to continue down the Timp-Torne Trail off The Timp for a short distance to the junction with the Ramapo-Dunderberg Trail. Turn right onto the trail marked by the red circles on a white rectangle.
The longest, most difficult and therefore most rewarding option is to continue on the Timp-Torne Trail as it descends into a low area on the other side of the Timp. This is quite a drop from the top of the Timp and is steep at times. The blue trail intersects on old road and turns left following the road for a short distance. The trail then heads right into the woods, up a hill and toward the Torne. Continue on up the road looking for the red and white markers on the right that announce the beginning of the Ramapo-Dunderberg Trail. Follow this trail passed any other trails or roads that turn off of it. The trail skirts the lower edge of the Timp and passes many impressive talus slopes as it winds its way around the Timp. Eventually it turns left and heads STRAIGHT UP THE TIMP! This is a rather long and difficult climb which has few level areas until it nears the top of the Timp. Eventually you will be back at the junction with the blue Timp-Torne Trail near the top of the Timp. DO NOT turn but continue on the read and white marked trail.
The Ramapo-Dunderberg Trail rises and falls several times on the approach to Bald Mountain. The climb up Bald is steep at times but not impossible. Bald has views directly north to Bear Mountain which can be recognized by the Perkins Tower at the top. Looking down and in a northeasterly direction you can easily see the Bear Mountain Bridge. Below the summit of Bald are several depressions and one tunnel that make up the Cornell Mines. Continue on the red blazed trail and pass the point where the blue blazed Cornell Mine trail meets it from the north. You will soon pass over Dunderberg Mountain. This can easily be missed since it is not much higher than the other points on the ridge. As you continue to hike, you will begin to get a hint of the scenic views that the eastern end of this ridge has to offer. Several climbs pass through swampy areas and lead to the eastern end of the ridge. Apparently a forest fire swept through this area since most of the trees are dead and show scorch marks. The dead trees combined with the remaining rock outcroppings gives this area an eerie, desolate appearance. As you reach the top of the easternmost part of the ridge the Hudson comes into view along with the communities and industry that line its shore. The view from the ridge proper is virtually unimpeded but several side trails lead to lookouts with breathtaking views of the river.
The trail turns south and then west as it completes the loop back to where you started. A laid stone pylon is present in the area where the donkey engine was to be place for the spiral railway. From this area the trail is almost all graded railroad bed. Large angular stone do not make the best footing and do not cushion a fall. The trail flattens as it approaches the end. Here there are several more good examples of level railroad bed hinting at the work done on the railway.
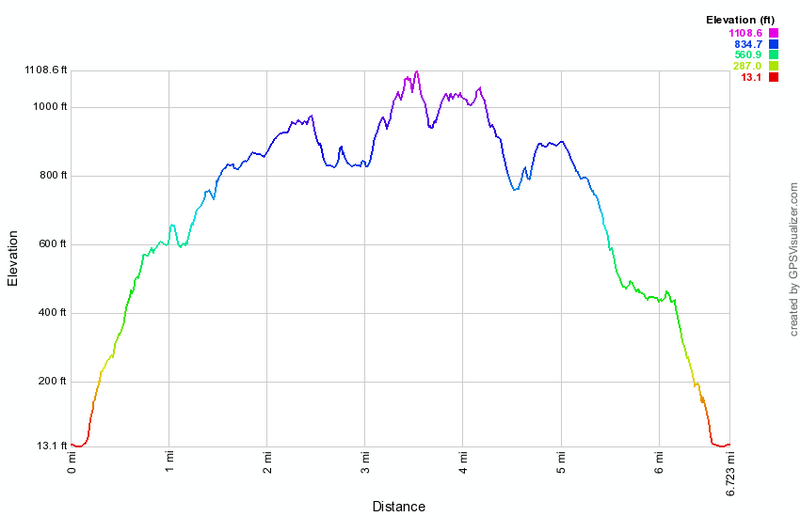 (The image at the left shows the profile of the hike. Remember that all vertical profiles are relative!)
Harriman: Dunderberg Mountain - The Timp Loop
| Quick Look | ||||
|---|---|---|---|---|
| Difficulty | Round trip | Total climb | Internet Maps | |
| 7.8 mi | 2323 ft | AllTrails | ||
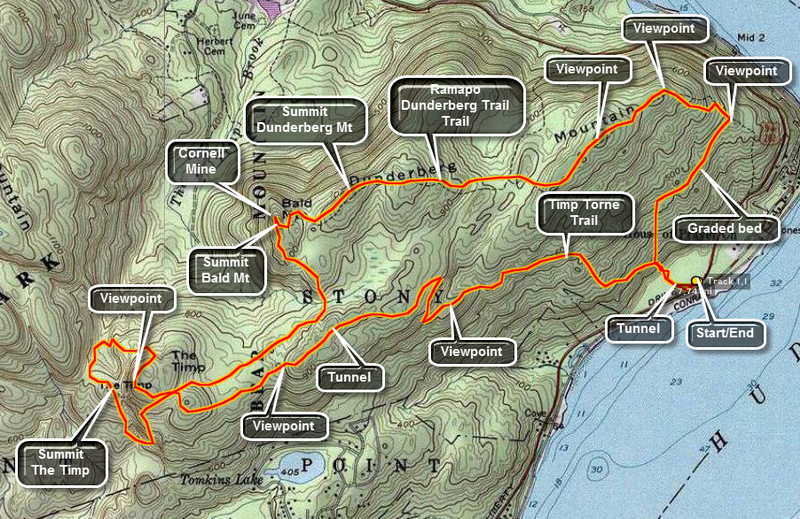
The parking for the trail head is on Route 9W about a mile south of the junction with Route 202. It is just north of the Anchor Monument on 9W. Once parked walk south on 9W for a short distance. Watch for a small stake with blaze markings. The blazes should be blue for the Timp-Torne Trail and a red circle on a white background for the Ramapo-Dunderberg Trail. Be prepared to ascend a steep grade up to the first level of the Dunderberg Ridge. Watch for a small laid stone tunnel on your left just as the steep climb begins. As you climb you will begin to get some nice views of the Hudson River, the towns that line it and the power plants that use the water for cooling. These views are nice but nothing compared to the ones you WILL get as you ascend to the top of the ridge.
The trail splits at the top of the short ascent. The blue blazed Timp-Torne trail goes left while the red blazed Ramapo-Dunderberg Trail heads off to the right. Both the trails parallel or cross railway beds that are the remains of an aborted spiral railway from the late 1890's. Although it was never completed much of the work that was done is still visible. Turn left an follow the blue blazes. This trail alternates flat sections along the railbed with steep but short climbs up to the next level of the ridge. Several areas have switchbacks to make the climbing easier. There are also several rock scrambles which keep things interesting. As you hike, keep a lookout for the tunnel entrance blasted into the mountain's rock. It will be on your right and is unmistakable. It was never completed and is a dead end. Just passed the tunnel is a great example of how the railway bed was built up and leveled off. After ascending to the highest point on the one side of the ridge the trail drops a little before the climb up to The Timp. The views from here are excellent to the south, west and north. Almost directly west is West Mountain. Look carefully to spot the West Mountain Shelter. From this point there are several options that vary slightly in distance and difficulty.
The first option is to turn around and return the way you came to the low area where the 1777 trail crosses the Timp-Torne Trail The 1777 trail crosses at the lowest point in the area. Turn left onto this trail and walk for a VERY short distance. Keep a lookout for the red blazed Ramapo-Dunderberg Trail on the right.
Another option is to continue down the Timp-Torne Trail off The Timp for a short distance to the junction with the Ramapo-Dunderberg Trail. Turn right onto the trail marked by the red circles on a white rectangle.
The longest, most difficult and therefore most rewarding option is to continue on the Timp-Torne Trail as it descends into a low area on the other side of the Timp. This is quite a drop from the top of the Timp and is steep at times. The blue trail intersects on old road and turns left following the road for a short distance. The trail then heads right into the woods, up a hill and toward the Torne. Continue on up the road looking for the red and white markers on the right that announce the beginning of the Ramapo-Dunderberg Trail. Follow this trail passed any other trails or roads that turn off of it. The trail skirts the lower edge of the Timp and passes many impressive talus slopes as it winds its way around the Timp. Eventually it turns left and heads STRAIGHT UP THE TIMP! This is a rather long and difficult climb which has few level areas until it nears the top of the Timp. Eventually you will be back at the junction with the blue Timp-Torne Trail near the top of the Timp. DO NOT turn but continue on the read and white marked trail.
The Ramapo-Dunderberg Trail rises and falls several times on the approach to Bald Mountain. The climb up Bald is steep at times but not impossible. Bald has views directly north to Bear Mountain which can be recognized by the Perkins Tower at the top. Looking down and in a northeasterly direction you can easily see the Bear Mountain Bridge. Below the summit of Bald are several depressions and one tunnel that make up the Cornell Mines. Continue on the red blazed trail and pass the point where the blue blazed Cornell Mine trail meets it from the north. You will soon pass over Dunderberg Mountain. This can easily be missed since it is not much higher than the other points on the ridge. As you continue to hike, you will begin to get a hint of the scenic views that the eastern end of this ridge has to offer. Several climbs pass through swampy areas and lead to the eastern end of the ridge. Apparently a forest fire swept through this area since most of the trees are dead and show scorch marks. The dead trees combined with the remaining rock outcroppings gives this area an eerie, desolate appearance. As you reach the top of the easternmost part of the ridge the Hudson comes into view along with the communities and industry that line its shore. The view from the ridge proper is virtually unimpeded but several side trails lead to lookouts with breathtaking views of the river.
The trail turns south and then west as it completes the loop back to where you started. A laid stone pylon is present in the area where the donkey engine was to be place for the spiral railway. From this area the trail is almost all graded railroad bed. Large angular stone do not make the best footing and do not cushion a fall. The trail flattens as it approaches the end. Here there are several more good examples of level railroad bed hinting at the work done on the railway.
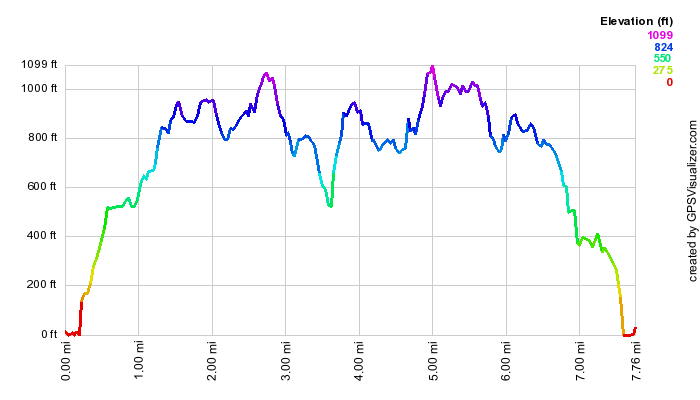 (The image at the left shows the profile of the hike. Remember that all vertical profiles are
relative!)
(The image at the left shows the profile of the hike. Remember that all vertical profiles are
relative!)
Harriman: Dunderberg Mountain Loop to The Timp
| Quick Look | ||||
|---|---|---|---|---|
| Difficulty | Round trip | Total climb | Internet Maps | |
| 8.0 mi | 2263 ft | AllTrails | ||

The parking for the trail head is on Route 9W about a mile south of the junction with Route 202. It is just north of the Anchor Monument on 9W. Once parked walk south on 9W for a short distance. Watch for a small stake with blaze markings. The blazes should be blue for the Timp-Torne Trail and a red circle on a white background for the Ramapo-Dunderberg Trail. Be prepared to ascend a steep grade up to the first level of the Dunderberg Ridge. Watch for a small laid stone tunnel on your left just as the steep climb begins. As you climb you will begin to get some nice views of the Hudson River, the towns that line it and the power plants that use the water for cooling. These views are nice but nothing compared to the ones you WILL get as you ascend to the top of the ridge.
The trail splits at the top of the short ascent. The blue blazed Timp-Torne trail goes left while the red blazed Ramapo-Dunderberg Trail heads off to the right. Both the trails parallel or cross railway beds that are the remains of an aborted spiral railway from the late 1890's. Although it was never completed much of the work that was done is still visible. Turn left an follow the blue blazes. This trail alternates flat sections along the railbed with steep but short climbs up to the next level of the ridge. Several areas have switchbacks to make the climbing easier. There are also several rock scrambles which keep things interesting. As you hike, keep a lookout for the tunnel entrance blasted into the mountain's rock at about 1 mile into your hike. It will be on your right and is unmistakable. It was never completed and is a dead end. Just passed the tunnel is a great example of how the railway bed was built up and leveled off. Continue on the blue trail and you will cross the 1777 Trail at 2.6 miles. You will begin to climb to a high point an a rock outcrop. This is marked as the Timp on some maps and GPS units but it is not. After ascending to this high point on the ridge the trail drops a little before the climb up to The Timp. At 3 miles you will come to the junction with the Ramapo-Dunderberg Trail. Stay to the left on the blue Timp-Torne Trail to get to the Timp. The views from the summit are excellent to the south, west and north. Slightly to the northwest is West Mountain. Look carefully to spot the West Mountain Shelter. More to the north is the Perkins Tower on Bear Mountain and below it the Bear Mountain Bridge. To the south you can see the New York City skyline.
Retrace your steps to back down the Timp to the junction with the Ramapo-Dunderberg Trail. Turn left to start your return trip. Follow this trail passed any other trails or roads that turn off of it. The Ramapo-Dunderberg Trail rises and falls several times on the approach to Bald Mountain. The climb up Bald is steep at times but not impossible. There are views directly north to Bear Mountain which can be recognized by the Perkins Tower at the top. Looking down and in a northeasterly direction you can easily see the Bear Mountain Bridge. Below the summit of Bald are several depressions and one tunnel that make up the Cornell Mines. Continue on the red blazed trail and pass the point where the blue blazed Cornell Mine trail meets it from the north. You will soon pass over Dunderberg Mountain. This can easily be missed since it is not much higher than the other points on the ridge. As you continue to hike, you will begin to get a hint of the scenic views that the eastern end of this ridge has to offer. Several climbs pass through swampy areas and lead to the eastern end of the ridge. Apparently a forest fire swept through this area since most of the trees are dead and show scorch marks. The dead trees combined with the remaining rock outcroppings gives this area an eerie, desolate appearance. As you reach the top of the easternmost part of the ridge the Hudson comes into view along with the communities and industry that line its shore. The view from the ridge proper is virtually unimpeded but several side trails lead to lookouts with breathtaking views of the river.
The trail turns south and then a little west as it completes the loop back to where you started. There is another nice lookout just above Jones Point and there is a white spur trail leading to it. Further along the main trail is a laid stone pylon is present in the area where the donkey engine was to be place for the spiral railway. From this area the trail is almost all graded railroad bed. Large angular stone do not make the best footing and do not cushion a fall. The trail flattens as it approaches the trail junction with the Timp-Torne Trail. Here there are several more good examples of level railroad bed hinting at the work done on the railway. Turn left at the junction and retrace your steps back down the trail to the parking area.
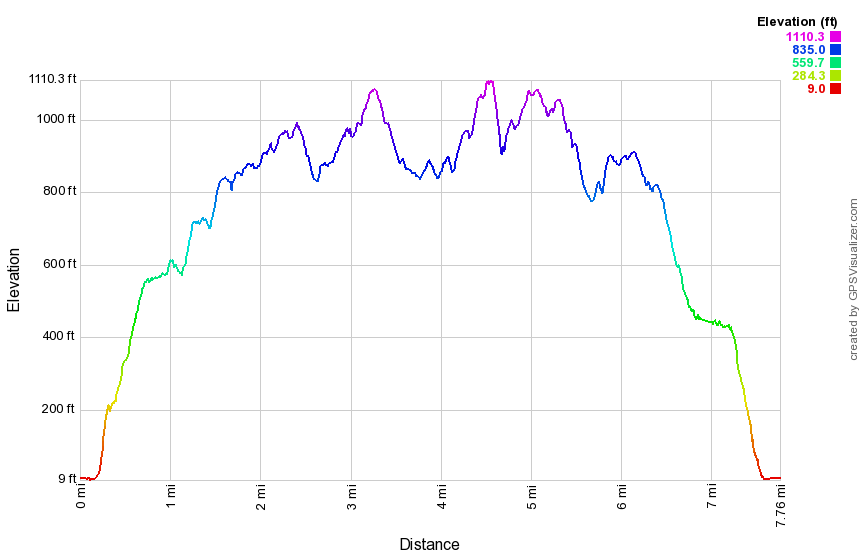 (The image at the left shows the profile of the hike. Remember that all vertical profiles are
relative!)
(The image at the left shows the profile of the hike. Remember that all vertical profiles are
relative!)
Harriman: Elk Pen to Little Dam Lake
| Quick Look | ||||
|---|---|---|---|---|
| Difficulty | Round trip | Total climb | Internet Maps | |
| 6.8 mi. | 2093 ft. | AllTrails | ||

Take the exit for Route 17 south to Harriman off Route 17. This is the last exit before the tolls heading east or the first exit after the tolls heading west. Drive south toward Tuxedo for about 4 miles and turn left on Arden Valley Road. There will be a sign for Harriman State Park on Route 17. Drive across the bridge over Interstate 87 and park in the parking area on the right.
Start your hike by exiting the parking area to the west and hiking a short trail to Arden Valley Road. Turn left on the road and hike back out to Route 17. Cross the road and watch for the white blazes of the At slightly to the right. Enter the woods and hike a short distance to a set of steps on the hillside. A sign indicates various destinations along the AT and their distances. Your objective is Little Dam Lake about 2.8 mile ahead. What the sign does not say is that you will be hiking up and down hills for most of the trip. The first climb is called Agony Grind and, depending on your level of fitness, may live up to its name. The trail ascends over 500 feet in about.35 making the average grade around 26%. The ground levels a little at the top before descending slightly and then climbing up to the top of another hill which is higher than the first. You will pass through some dwarf pines at about 1.25 miles. Continue your journey by descending from the top of the hill and then climbing another. At 1.8 miles you will be at the top of a hill and ready to descend to cross the Orange Turnpike. Descend to the road and turn left to pick up the AT about 200 feet south. Upon entering the woods you will be confronted by another hill. Just before the ascent you may find a cooler with jugs of water by the side of the trail. A "trail angel" named John leaves apples and bananas and other snacks as well as the water. Climb to the top of the last hill before the lake and you may find a shelter constructed by John. Hiked down the hill and follow the AT along the northern shore of Little Dam Lake and then southwest along the western shore> You will find that the trail crosses a stream using some large boulders as stepping stones. A bridge once stood here but was damaged in a storm. Once you have reached the stones you may continue across and hike many hike toward Fitzgerald Falls, the Wildcat Shelter and Mount Peter. Turn around and retrace your steps back to the car.
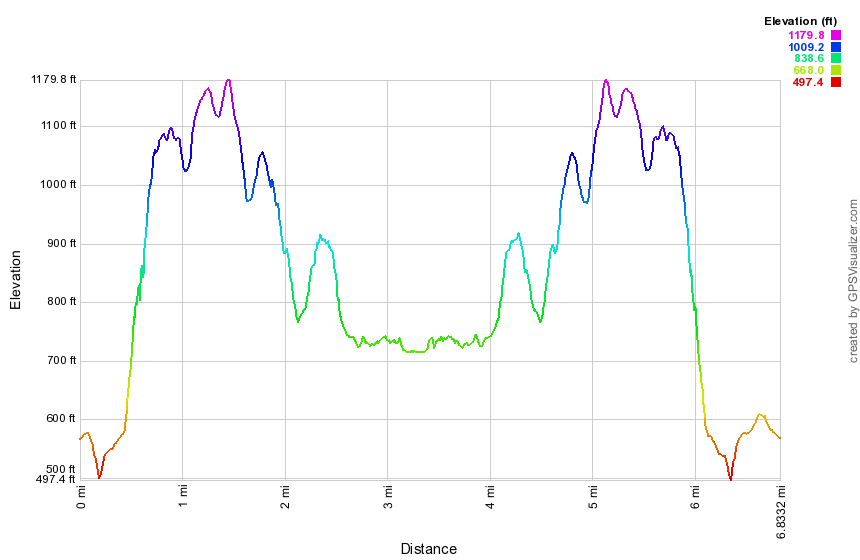 (The image at the left shows the profile of the hike. Remember that all vertical profiles are relative!)
Harriman: Lake Sebago to Cascade of Slid
| Quick Look | ||||
|---|---|---|---|---|
| Difficulty | Round trip | Total climb | Internet Maps | |
| 6.1 mi. | 1310 ft. | AllTrails | ||
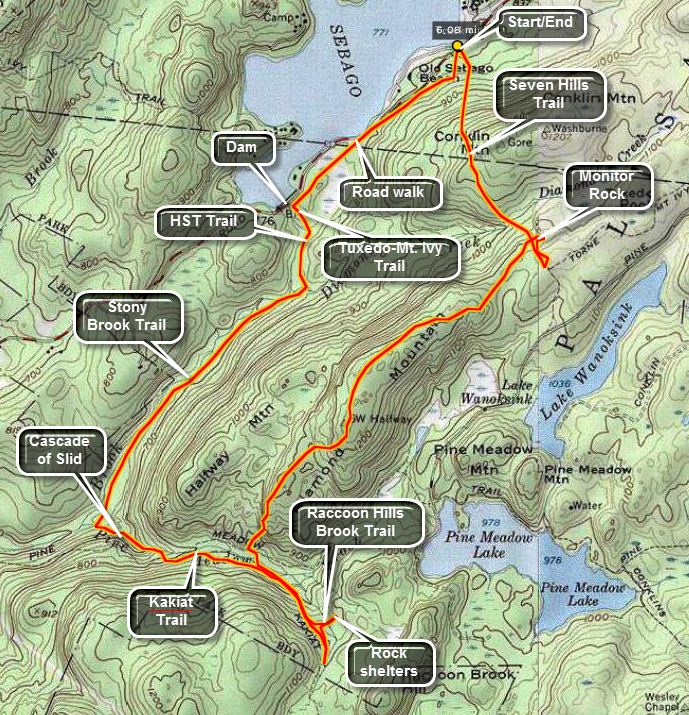
Take Seven Lakes Drive southwest from the Long Mountain Circle near Bear Mountain. Pass through the Tiorati Circle staying on Seven Lakes Drive. Pass through the Kanawauke Circle and continue southwest on Seven Lakes Drive until the parking area for the Lake Sebago boat launch on the right. Walk out the driveway to Seven Lakes Drive and cross to the other side. The start of the Seven Hills Trail is marked by three blue on white blazes. The trail ascends Conklin Mountain for about .75 miles before turning right or southeast. Look to the left at this turn to see a high rock cliff with a boulder perched on top. This is Monitor Rock and is worth the short climb on the path to the left. After returning from Monitor Rock, continue up the woods road before making the turn on the trail. Watch for another path to the left and follow it to another set of boulders and a red brick "structure". Return to the woods road, turn right and go back to the area where the Seven Hills trail turns southwest. Make the turn and start to walk along the Diamond MountainRidge.
After about .5 miles there is a nice lookout over Lake Sebago. Continue on the trail passing a large boulder called the "cracked diamond". The trail flattens as it passes over some exposed rock and starts to descend. The views here are not spectacular and include mostly featureless forest. After passing the area where the HST Trail follows the Seven Hills trail, the trail begins to descend and the descent is STEEP in several different places. The trail descends to a stream. Turn left and follow the blue blazes to the bridge across the stream. The trail soon bears to the right. Follow the white blazes of the Kakiat Trail to the left. Within .25 miles the black blazes of the Raccoon Brook Hills trail turns off to the left. Follow this trail down to the brook and cross it. At the base of the rock ledges and cliffs are several rock shelters once used by Native Americans. Numerous artifacts were recovered from these shelters and placed in the Harriman Museum. Retrace your path to the area of the bridge over the stream.
Follow the red blazes of the Pine Meadow Trail for about .25 miles until it meets the orange blazed HST Trail. Turn right on this trail and cross the bridge. Below the bridge is a cascade of water over several different drops called the Cascade of Slid. Follow the white blazes of the Kakiat Trail until it meets the yellow blazed Stony Brook Trail just before another bridge. The Stony Brook Trail parallels Stony Brook and is a nice, relatively flat walk beside a stream. This trail continue for a little over a mile until it meets the HST and then the Tuxedo-Mt. Ivy Trail. In about .3 miles you will be at the base of the Lake Sebago dam. Walk the .75 miles back to the parking area on the Seven Lakes Drive.
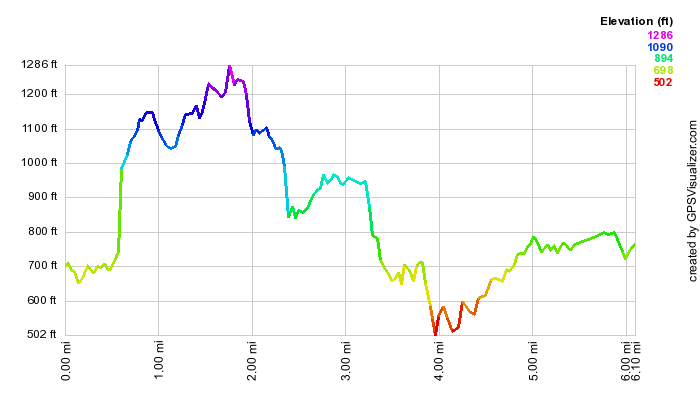 (The image at the left shows the profile of the hike. Remember that all vertical profiles are
relative!)
(The image at the left shows the profile of the hike. Remember that all vertical profiles are
relative!)
Harriman: Lake Skanatati to Pine Swamp Mountain
| Quick Look | ||||
|---|---|---|---|---|
| Difficulty | Round trip | Total climb | Internet Maps | |
| 5.6 mi. | 980 ft. | AllTrails | ||
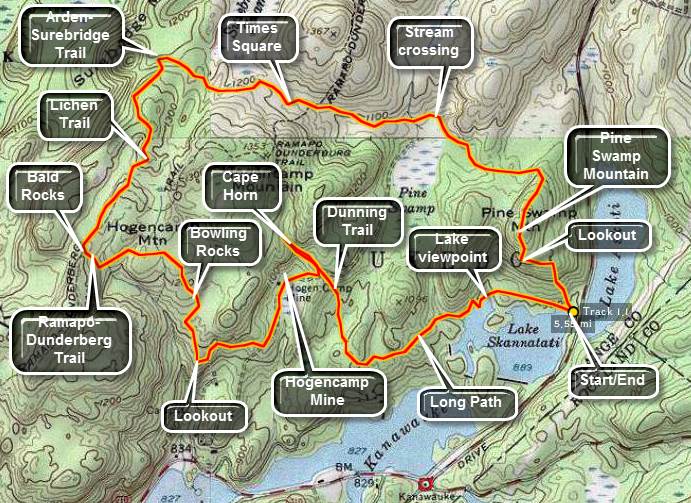
Take Seven Lakes Drive southwest from the Long Mountain Circle near Bear Mountain. Pass through the Tiorati Circle staying on Seven Lakes Drive. Just passed Lake Tiorati there are two lakes, one on each side of the road. These are Lakes Askoti and Skanatati. Pull into the parking area on the right next to Lake Skanatati. This lake is larger than it looks as you will see when you hike along the shore and see it from above. The trails start to the right of the lake. Bear to the left on the Long Path marked with aqua paint. As you walk along this path there are several opportunities to walk down to the lake to get a better view. After following the shoreline of the lake the Long Path continues west and then turns north. At 1.1 miles the Long Path meets the yellow marked Dunning Trail.
Continue north on the Long Path for about .2 miles. The trail ascends gently passed some really impressive rock formations and a cold mountain stream. Continue up the trail until you see a pair of glacial erratics on a hill above you. There was extensive mining in this area and you may see the opening of mine adits, mine pits and equipment. Turn around and hike back to the junction with the Dunning Trail. Turn right and follow the Dunning Trail west .15 miles. In this area there are extensive tailings from the Hogencamp Iron Mines. There are also open pits and at least one adit. The trail continues south and then west for .45 miles before turning abruptly north. In this area, there is a nice lookout over Little Long Pond. This is a good place to stop for a rest before continuing north.
Take the Dunning Trail north as it ascends about .3 miles to the Bowling Rocks. Here there is a long narrow open rock face with several medium sized boulders. All that is needed are some "pins". Continue walking another .35 miles to the Bald Rocks and the junction with the Ramapo-Dunderberg Trail. The Bald Rocks can be accessed from an unmarked trail just before the RD junction or turn left on the RD and walk up a slight incline to the Bald Rocks. At the trail junction turn right on the red marked RD Trail. This trail has many open rock faces some of which are flat but MANY of which are tilted. These areas can be slippery when wet, cold when windy and IMPOSSIBLE when icy. The trail descends into a swale with a small stream. There is a log bridge here. On the other side the trail ascends up a short rock scramble and then up an open rock face. The RD Trail goes up and over the top. At the top look down to you left to see a small pond often frequented by wildlife. Continue for several hundred feet on the RD Trail. Look straight ahead to see a large glacial erratic that looks a little like the prow of a ship. Return to the top of the rock outcrop and turn right. Watch for the blue L on a white background that marks the Lichen trail. The total distance from the Dunning-RD junction is about .35 miles.
The Lichen Trail runs to an elevated rock plateau and continues straight ahead off the plateau and down to the left. After wrapping around a rock outcrop to the right the trail ascends over...an open rock face. From this point is a nice lookout over Island Pond. The trail continues .35 miles along open rock and descends steeply down to the Arden-Surebridge Trail which is marked with red triangles. Turn right on the ASB Trail and continue over relatively flat but often wet ground for .45 miles to Times Square. This is a junction of four trails and a woods road. The trails are well marked but make sure you continue ahead and slightly to the right on the ASB Trail. This trail has its ups and downs as it continues .45 miles to the junction with the Dunning Trail. Pick your way across a stream that eventually empties into Pine Swamp and stay on the ASB Trail. South on the Dunning Trail are the remains of the Pine Swamp Iron Mine. This mine has an adit that can be entered in drier weather and a large stope.
The ASB Trail continues east for .5 miles and then turns directly south and starts to climb Pine Swamp Mountain. In .2 miles you will be at the top of the mountain. The climb is not difficult and proceeds along a wide woods road. From the top of Pine Swamp Mountain are several nice lookouts over the surrounding lakes. Directly south is lake Skanatati and just beyond the two part of Lake Kanawauke. Around to the left Lake Askoti is partly visible with Little Long Pond on the extreme right. After taking some time to enjoy the view and take pictures, get back on the trail and descend to the parking lot .35 miles away. This descent is steep in spots with one short rock scramble.
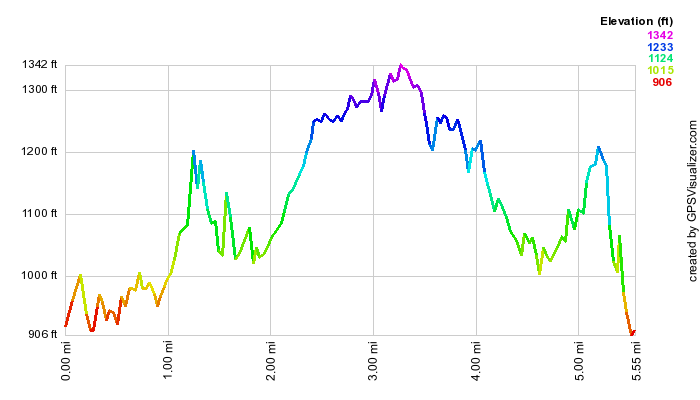 (The image at the left shows the profile of the hike. Remember that all vertical profiles are
relative!)
(The image at the left shows the profile of the hike. Remember that all vertical profiles are
relative!)
Harriman: Lake Skanatati to St. John's Road
| Quick Look | ||||
|---|---|---|---|---|
| Difficulty | Round trip | Total climb | Internet Maps | |
| 3.5 mi. | 555 ft. | AllTrails | ||
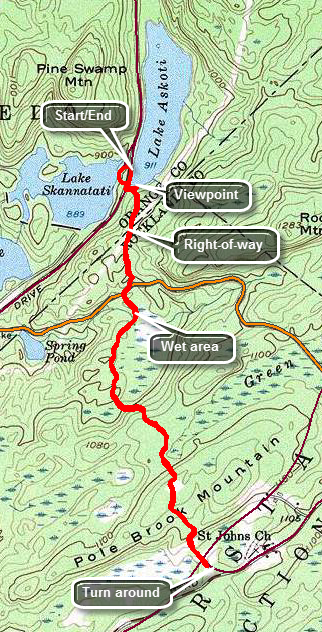
Take Seven Lakes Drive southwest from the Long Mountain Circle near Bear Mountain. Pass through the Tiorati Circle staying on Seven Lakes Drive. Just passed Lake Tiorati there are two lakes, one on each side of the road. These are Lakes Askoti and Skannatati. Pull into the parking area on the right next to Lake Skannatati. Walk out the far end of the parking area following the aqua blazes. Walk up to the road, hop the guard rail and cross to the other side. Follow the blazes onto a gravel and cinder road until they veer to the right. The trail leads to a woods road and stays on it for a short distance before the leaving the road and starting a gentle climb. Crossed a right-of-way with a telephone cable and three stands of open wire. At .4 miles you will hit the top of the hill and then drop to Route 106 at .5 miles. Turn right on the road and walk a few hundred feet to the Long Path blazes on the left. The trail crosses a marshy area on some thin slats nailed to some thin rails. Head south toward Lake Welch Drive and St. John's Road as the trail gains about 175 feet from 1 mile to 1.4 miles. Along the way there is a small foundation on the right side of the trail. The trail travels over a flat area and then begins the descent from the little ridge to Lake Welch Drive. With the road in sight watch for a woods road which is lined on either side by large boulders. Walk out to Lake Welch Drive, cross the road and find the Long Path blazes on the right side of St. John's Road. Walk along the trail for a few feet and then turned around and retrace your route to the car. Further down St. John's road is the St. John's in the Wilderness Church is a beautiful, old church with a rich history. Each year the church holds a special Palm Sunday service for hikers. I have never been inside but hope to attend services there this next year. The architecture from the outside is worth a visit.
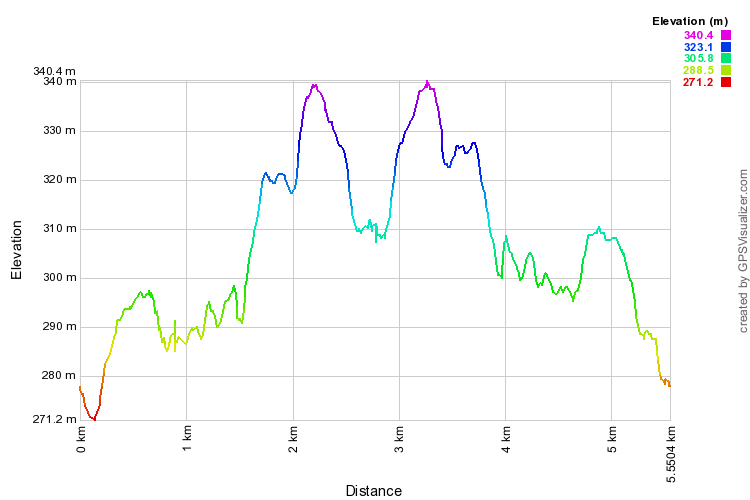 (The image at the left shows the profile of the hike. Remember that all vertical profiles are relative!)
Harriman: Lake Tiorati to Brien Shelter
| Quick Look | ||||
|---|---|---|---|---|
| Difficulty | Round trip | Total climb | Internet Maps | |
| 8.2 mi. | 1650 ft. | AllTrails | ||
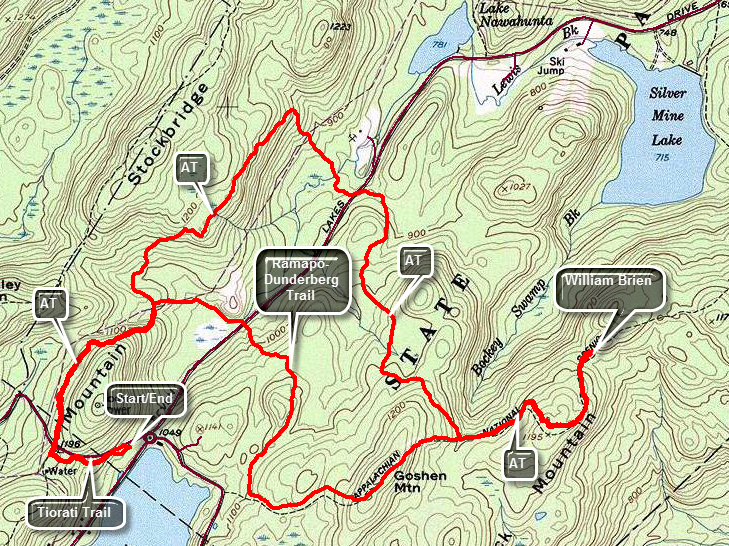
Take Seven Lakes Drive southwest from the Long Mountain Circle near Bear Mountain. At the Tiorati Circle turn right on Arden Valley Road and park in the parking area on the left. Find the blue blazed Tiorati Trail that leaves the parking area heading west and roughly parallelling Arden Valley Road. After about .3 miles, the blue trail ends at the AT and Ramapo-Dunderberg Trail. Turn right and follow the trail blazes. The trail undulates a bit but then descends and at about 1 mile the Ramapo-Dunderberg Trail heads off to the right. Stay on the AT and head northeast along the shoulder of Stockbridge Mountain ridge. At 1.75 miles you will begin to drop about 300 feet until you crossed Seven Lakes Drive at 2.5 miles. From the road the trail continues on a woods road but the AT markings are very faded compared to the bright white on the western side. After a short distance on the woods road, the trail cuts into the woods heading south then southeast. At 3.5 miles you regain the 300 feet you dropped on the other side of the road. At 3.7 miles the Ramapo-Dunderberg Trail turns right as you continue on the AT following the white blazes to the left. The trail gains a little elevation and then begins to drop. The William Brien Shelter will appear at 4.4 miles. You are now ready to return so turn around and retrace your path back to the junction with the Ramapo-Dunderberg Trail at 5.2 miles. Head left to use this trail to return. The trail meanders up and down and generally heads WSW. At 6.1 miles it heads north and then east before crossing Seven Lakes Drive at 6.8 miles. At 7.2 miles you will meet the AT again. Turn left heading west toward Arden Valley Road. The .75 miles back to the road is all uphill but it is not steep. Cross the road and turn left shortly after to take the Tiorati Trail back to the car.
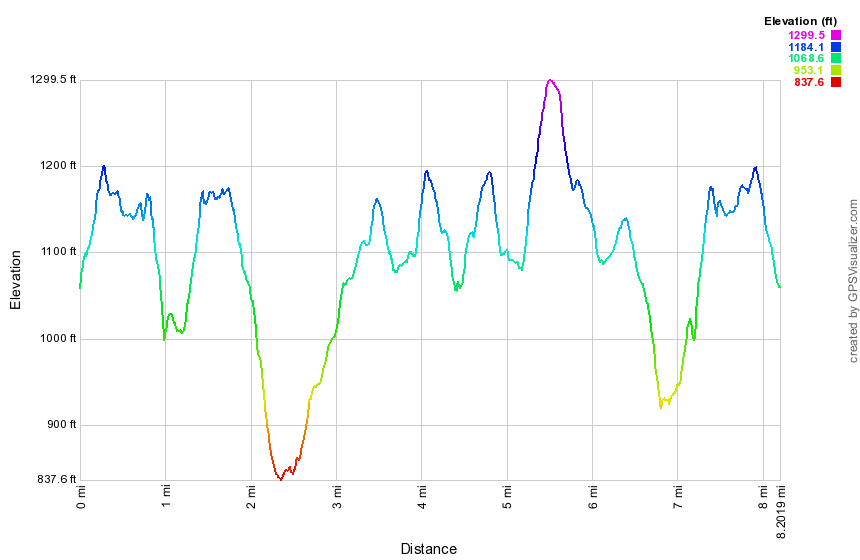 (The image at the left shows the profile of the hike. Remember that all vertical profiles are
relative!)
(The image at the left shows the profile of the hike. Remember that all vertical profiles are
relative!)
Harriman: Lake Tiorati to Hippo Rock
| Quick Look | ||||
|---|---|---|---|---|
| Difficulty | Round trip | Total climb | Internet Maps | |
| 4.9 mi. | 1040 ft. | AllTrails | ||
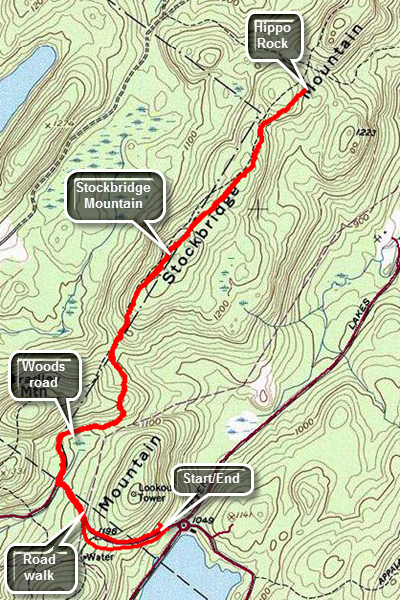
Take Seven Lakes Drive southwest from the Long Mountain Circle near Bear Mountain. At the Tiorati Circle turn right on Arden Valley Road and park in the parking area on the left. Walk up to the Arden Valley Road and head west and north on the road. Walk up and down the hill, to find the Long Path at the point where the road makes a sharp left. The aqua blazes are clear on both the rocks and trees. Turn right onto a wide woods road and walk passed a gate heading north and then north northeast. At 1 mile the trail turns to the north again and rises over the top of a ridge and descends down the other side. The forest is all hardwoods and very open. As you come down off the first, small ridge you enter the area between two ridges. It is very rocky as is typical of Harriman. Begin to climb up the Stockbridge Ridge to Stockbridge Mountain. The climb looks steep on the profile but is only about a 10% grade. At the top of the mountain is a flat, open area with a limited view. Descend from Southbridge Mountain still heading north and continue north along the trail as it rolls some. Hippo Rock is a large and precariously balanced glacial erratic on the left side of the trail. As you descend a hill at 2.5 miles the rock will be directly ahead and is unmistakable. When you are done at the rock, turn around and retrace your route back to the car.
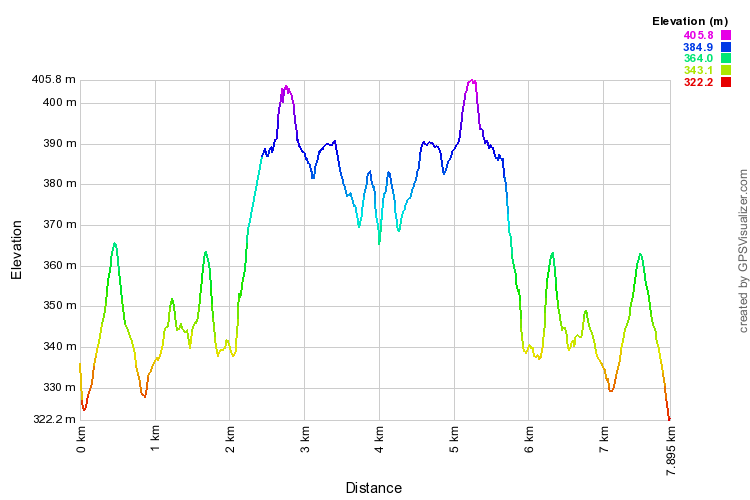 (The image at the left shows the profile of the hike. Remember that all vertical profiles are relative!)
Harriman: Lake Tiorati to Lemon Squeezer
| Quick Look | ||||
|---|---|---|---|---|
| Difficulty | Round trip | Total climb | Internet Maps | |
| 7.1 mi. | 1700 ft. | AllTrails | ||
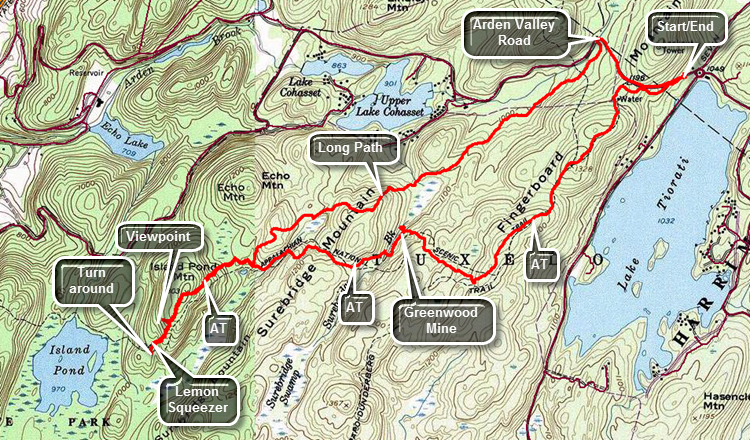
Take Seven Lakes Drive southwest from the Long Mountain Circle near Bear Mountain. At the Tiorati Circle turn right on Arden Valley Road and park in the parking area on the left. Find the blue blazed Tiorati Trail that leaves the parking area heading west and roughly parallelling Arden Valley Road. After about .3 miles, the blue trail ends at the AT and Ramapo-Dunderberg Trail. Turn left and follow the trail blazes. Almost immediately you will pass by a new steel water storage tank on the right and the old cement and wooden cistern on the left. The trail begins to climb to the top of the Fingerboard Mountain Ridge. The trail generally ascends and you will hit 1375 feet at the highest point which is a little more than 400 feet higher than the parking area. You can see Lake Tiorati below if there are no leaves on the trees but there is never a good enough vantage point to take pictures. The trail surface is typical for Harriman with areas of open rock faces alternating with jumbles of rocks and a few clear areas between! Watch for the numerous glacial erratics that litter the park. There ware three small but interesting "pink" boulders in one area which may be "pinks schist". At 1.3 miles you will be at the highest point of the ridge you will then drop almost all the elevation you gained as you hike downhill to Surebridge Brook. Do not cross the brook here but turn left to follow the AT along the brook. Watch for the tailings piles from the Greenwood Mine. The Harriman area is full of iron mines that date back as far as the period of the American Revolution. Some are just small pits while others like the Greenwood Mine are much bigger. Most of the Greenwood Mine is now underwater but the main adit and the tailings are visible along the trail. There is another large adit up on the hillside. Continue on the AT until it crosses the brook at 2.2 miles. Ascend a small hill and then walk back down the other side to the junction with the Long Path at 3 miles. Continue on the AT and begin the steepest climb of the day to the top of Island Pond Mountain. As you descend the other side watch for a nice lookout off to the right that has a beautiful view of Island Pond. Walk back to the trail and down the other side of the mountain to the area of the Lemon Squeezer. The Lemon Squeezer on the AT in Harriman is one of at least four that I know of and each is different and interesting in its own right. You will come to a point on the AT where there is a sheer drop of at least 10 feet with only a few handholds. You may try this descent or opt for the easy way which is marked by a sign that says ... "Easy Way"! Work your way back over to the Squeezer which is a narrow slot that you have to walk through. Walk back through the Squeezer and return to the junction with the Long Path. You will have to climb up and over Island Pond Mountain again. At 4.5 miles turn left or northeast on the Long Path. For the next 2.1 miles you will struggle over some very rocky terrain. Along the way you will hike up and down at least three hills. Nothing is very steep or very high but the constant hike over the rocks begins to become uncomfortable. Finally at 6.6 miles you will hit the Arden Valley Road. Turn right and walk on the flat, hard surface up a hill. Simply stay on the road and walk back to the car at the Lake Tiorati Circle parking area.
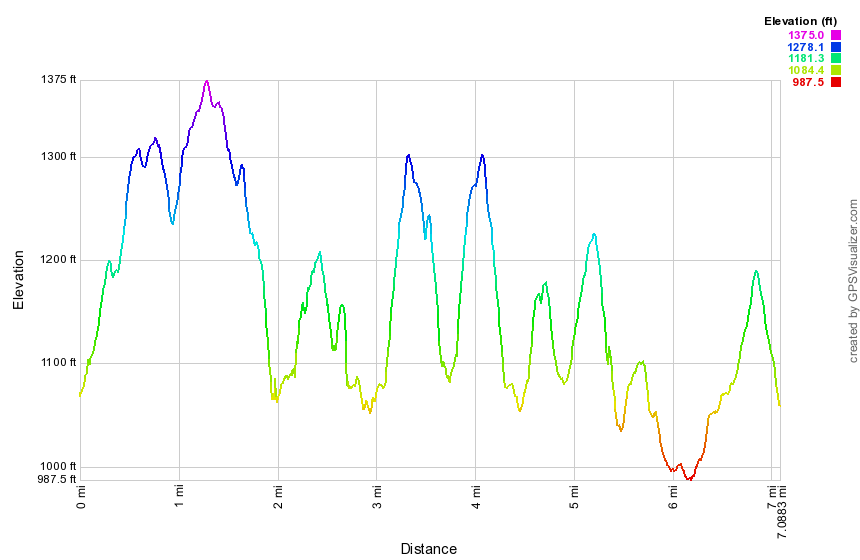 (The image at the left shows the profile of the hike. Remember that all vertical profiles are relative!)
Harriman: Long Path to 1779 Trail Loop
| Quick Look | ||||
|---|---|---|---|---|
| Difficulty | Round trip | Total climb | Internet Maps | |
| 10.9 mi. | 2170 ft. | AllTrails | ||
 Take I86, the Quickway, to the exit just before the Harriman toll plaza and get on Route 6 East. Drive a little more than 4 miles to the parking area on the left where the Long Path crosses the road. You may also take Route 6 West from the Bear Mountain traffic circle for less than a mile. In this case the parking area is on the right. From here the Long Path heads northeast toward Long Mountain and passes the Torrey Memorial on the way. Walk out the exit for the parking area and across the road since this hike heads in the opposite direction. The Long Path crosses almost directly across from the exit to the parking area. The trail follows wide woods roads in many places. Be careful as you hike since there are many fire roads and other paths that crisscross the trails and it is easy to get lost even with a map. The Long path heads almost directly southwest and climbs around 400 feet in the first 1.8 miles. Just before another climb there is a series of rock overhangs which are labeled "cave shelter" on the NYNJTC maps. Climb to the top of the rise and walk along a flat part of the trail to a rock shelter at 2.0 miles. The shelter faces west and the map marks it as a viewpoint. Like so many of the places that were once viewpoints the trees have grown to block most of the view. Descend to the junction with the yellow Menomine Trail but continue straight ahead to Hippo Rock at 2.3 miles into the hike. This rock really does look like a hippo from the front. Head back to the trail junction and turn right on the yellow Menomine Trail heading generally southeast. The trail is a long descent along a woods road and soon you will pass Lake Nawahunta. At 3.6 miles cross Seven Lakes Drive and head toward Silvermine Lake. Walk the trail along the west shore of the lake. Over the next .6 miles the trail gains 320 feet to the site of the Brien Memorial Shelter. The shelter is about 5.3 miles into the hike. Turn left onto the Appalachian Trail and starting up a short, steep rock climb. This trail is marked in white for the AT but also has red blazes as it is part of the Ramapo Dunderberg Trail. After reaching the top of the rock scramble, the trail flattens some with a few ups and downs. For about .9 miles from the shelter the trail rolls up and down slightly until at 7.2 miles it turns to the right. Now you are hiking southeast rather than northeast and starting up Black Mountain. After a short but steep climb there is a viewpoint over Silvermine Lake. Continue on to the summit at 7.7 miles into the hike. The views here include the New York City skyline. From the summit start down a very steep descent of almost 400 feet in .35 miles. A little further on turn left and head almost due north on the blue 1779 Trail. The trail parallels the Palisades Parkway which is just over a ridge to the right. There are no views but the 1.6 miles to Seven Lakes drive near the Long Mountain traffic circle is pleasant enough. At the traffic circle cross the road and head directly into the woods. DO NOT walk further up the road as the trail there is not marked and it will take you out of the way. Find a marker on a tree and then look ahead across the construction yard for another on a pole! Walk to the back left corner of the yard a find the trail and the markers. Enter the woods to continue the hike. The trail heads north toward the Popolopen Gorge Trail and Turkey Hill Lake just skirting a climb up Summer Hill. After about .6 miles, you may walk straight ahead on Summer Hill Road rather than take the circuitous route on the trail. If you want to stay on the trail, turn to the right. Be sure to turn left at the next trail junction! Just before you cross a small stream look for the trail on the left. It may be hard to spot since it is marked for an approach from the opposite direction. Stay on the trail and you will soon be at the dam for the lake. Continue around the west shore of the lake which has several spots to stop and take pictures. From the dam it is all uphill for the next .9 miles until you hit the Long Path again at 12.2 miles. Turn left on the Long Path and hike the .3 miles back to the car.
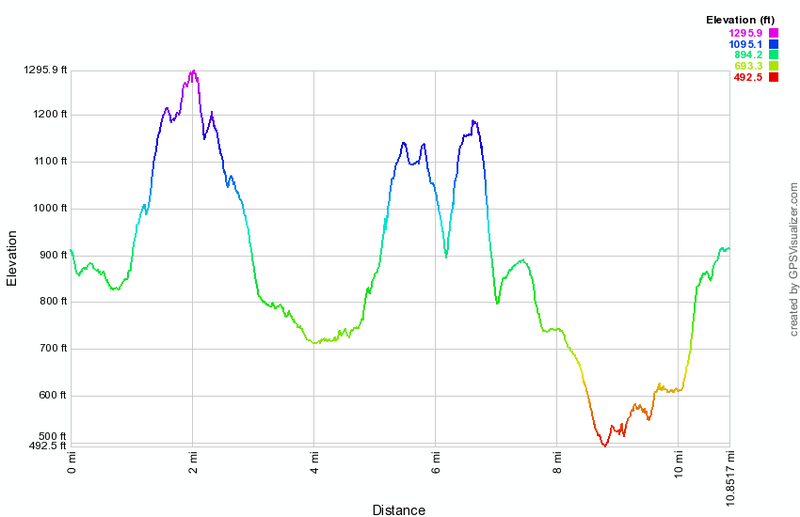 (The image at the left shows the profile of the hike. Remember that all vertical profiles are relative!)
Harriman: ORAK Ruins from St. John's Church
| Quick Look | ||||
|---|---|---|---|---|
| Difficulty | Round trip | Total climb | Internet Maps | |
| 6.7 mi. | 1295 ft. | AllTrails | ||
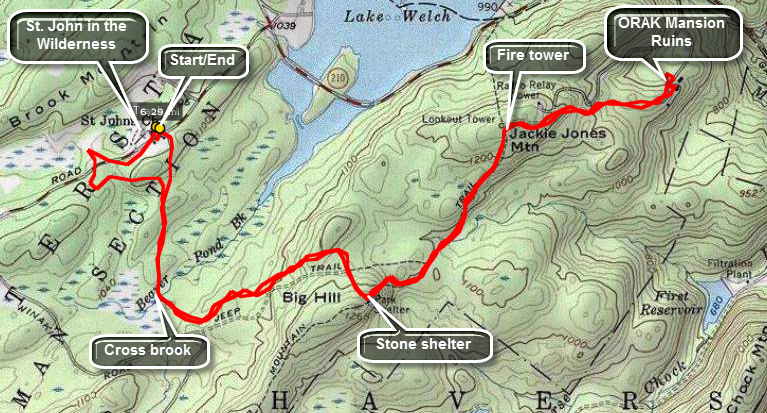
Take Seven Lakes Drive southwest from the Long Mountain Circle near Bear Mountain. Pass through the Tiorati Circle staying on Seven Lakes Drive. Pass through the Kanawauke Circle and continue southwest on Seven Lakes Drive until the sign for Lake Sebago Beach. Stay to the left and turn left to go toward Lake Welch Drive. Turn onto Lake Welch Drive and watch for St. John's Road, the first road on the right. Turn here and drive until you see St. John in the Wilderness Church on the left. Park in the parking lot. Walk back down the road for .3 miles toward Lake Welch Drive. At the end of the road just before Lake Welch Drive turn right off the road and begin to follow the aqua blazes of the Long Path. The trail alternates between trail and wider woods road in many places. It also makes several twists and turns and rolls over hills and at least one mountain. At .45 miles the trail bends sharply to the left and at .65 it turns onto a woods road to the right. The road also continues to the left and is a shortcut back to the church. After climbing a bit, you now descend to cross Beaver Pond Brook in a swampy area. Along but narrow causeway gets you across this area. Just after the causeway, notice the large grove of red pine which was probably planted in the area. At 1.2 miles the trail again turns to the left and parallels Pine Meadow Road. Stay on the trail as it rises to 1.7 miles and then turns right to cross the wide road. At 1.8 miles the trail tops out at Big Hill and the Big Hill Shelter. The shelter is the typical stone structure with dual fireplaces at the entrance and a pit in front. There is a limited view east to the Hudson. Here the Suffern Bear Mountain Trail comes in from the right and joins the Long Path for a short distance.
The trails now descend a rather steep slop. Watch straight ahead and you will see two large communications towers in the distance on Jackie Jones Mountain. To the left of these towers is a shorter fire tower where you are headed. At about 2.0 miles the Long Path bears right on a woods road. Follow the yellow SBM Trail to the left as it descends slightly and crosses a brook. At 2.15 miles the trail crosses Pine Meadow Road and begins the ascent up Jackie Jones Mountain. This mountain and Rockhouse Mountain are the highest points in Rockland County. At 2.7 miles , at the top of the mountain stands a now closed fire tower. Although the cab is closed, you can climb the tower for the view. Be careful as some of the boards look better than others. Also, if there is any wind at ground level it may be at a somewhat higher velocity near the top of the tower. The tower does offer good views for 360 degrees on the landing just below the cab. Back on the ground continue on the SBM Trail as it begins a descent passed the communications towers on the left. The trail bears to the right and passes over an open rock face. Maps mark this as a viewpoint but the view is limited by trees which have grown. The trail continues to descend and at about 3.0 mikes you will begin to see some stonework and foundations.
This marks the ruins of the ORAK mansion constructed in 1923 by an executive of the company that produced KARO syrup. The mansion was torn down years later but much of the stonework still remains. At first it doesn't look like much but keep walking toward the paved driveway. Bear right to what look like an open clearing. You are standing in what was once the dining room. To the left is a curved stone wall with excellent craftsmanship. The wall has and arched doorway and small, round windows. The owner liked ships and the sea and the dining room was built to resemble a ship. Walk back to and down the driveway. On the right are the foundations of other building. If you continue to walk on the driveway, the gatehouse, which is mostly intact, will be on the left. The trail at this point continues out to Gate hill Road or Route 106. Along the way is another mansion constructed by Rose Renard of Red Rose Tea fame. Turn around and walk back on the driveway. You may want to walk off to the right to see the remains of other outbuildings. When you are finished exploring, follow your route all the way back to the parking area and your car.
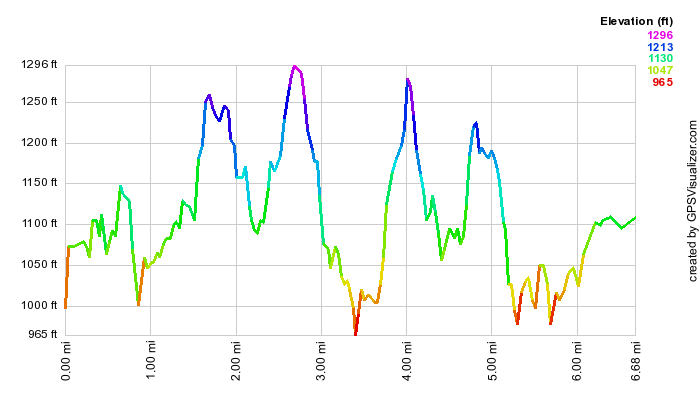 (The image at the left shows the profile of the hike. Remember that all vertical profiles are relative!)
Harriman: Pine Swamp and Hogencamp Mines
| Quick Look | ||||
|---|---|---|---|---|
| Difficulty | Round trip | Total climb | Internet Maps | |
| 4.1 mi. | 850 ft. | AllTrails | ||
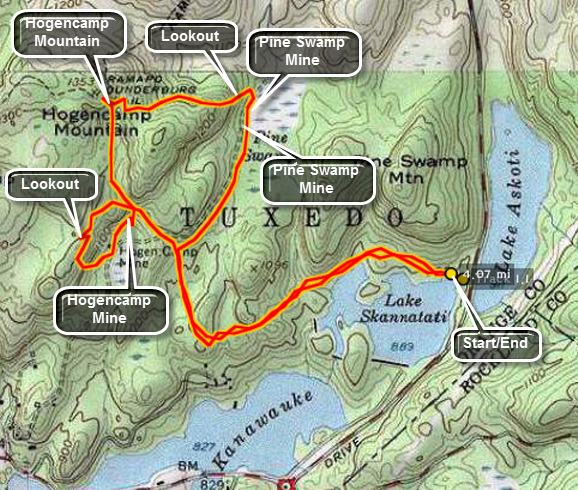
Take Seven Lakes Drive southwest from the Long Mountain Circle near Bear Mountain. Pass through the Tiorati Circle staying on Seven Lakes Drive. Just passed Lake Tiorati there are two lakes, one on each side of the road. These are Lakes Askoti and Skanatati. Pull into the parking area on the right next to Lake Skanatati. This lake is larger than it looks as you will see when you hike along the shore and see it from above. The trails start to the right of the lake. Bear to the left on the Long Path marked with aqua paint. As you walk along this path there are several opportunities to walk down to the lake to get a better view. After following the shoreline of the lake the Long Path continues west and then turns north. At 1.1 miles the Long Path meets the yellow marked Dunning Trail.
Bear right on the Dunning Trail and walk .5 miles watching for the Pine Swamp on the right and tailings piles on the left. As son as you see the tailing cut up the hill to the left watching for the paths other hikers have used. You should end up in a small area with pine trees. Straight ahead is the cut of the Pine Swamp Mine with walls 20 to 30 feet high. The entrance to the mine is straight ahead. It may be a little wet getting to the adit but the ore vein ran upward in this mine. Walk into the mine and carefully climb upward. Stop to look at the drill marks on the walls. Near the top of the mine is an air shaft. Work your way back down to the entrance and turn right and climb up the hill. Watch for the opening of the air shaft an the hill. At this point you can return to the Dunning Trail and follow it to Times Square. At Times Square take the Long Path over the hill to the Hogencamp Mine. You may also walk cross country and bushwhack from the hill above the Pine Swamp Mine to Hogencamp Mountain.
From the Long Path find a path to the top of Hogencamp Mountain. This is easier than finding the trail to the top. There is a nice view in all directions from the top of Hogencamp Mountain even though its elevation is not particularly great. Work your way back down to the Long Path. As you walk along the Long Path toward the mine keep an eye out for foundations that indicate buildings that were once part of the extensive Hogencamp Mining Complex. Eventually you will be walking along a small stream and between some large boulders on the left and a rock out cropping on the right. Walk past this are and watch for a path that goes down and to the right. This path leads to the most interesting cut of the mine. This cut passes into the rock under the trail you were just hiking. It is filled with water so it is hard to determine the depth. When you are in the cut, turn around and let your eye follow the trenches that parallel the base of the hill.
Walk along the base of the hill and in and out of the trenches. Be sure to walk down to the Dunning Trail to see the tailings piles on the left. You will also see a pit with a large pipe emerging vertically from the pit which is filled with water. Walk back up toward the base of the hill and watch for a deep hole. You may also see some laid stone which may have been part of some foundation. You may return to the Dunning Trail and walk back to the junction with the Long Path where you started the loop. If you have some additional time, climb the hill and walk the ridge above the mine. There are some views of the surrounding countryside and of the mine below. Keep walking and you will intersect the Long Path above the mine where you were before. Walk down the Long Path and to the junction with the Dunning Trail. Stay on the Long Path and retrace your path to the parking area.
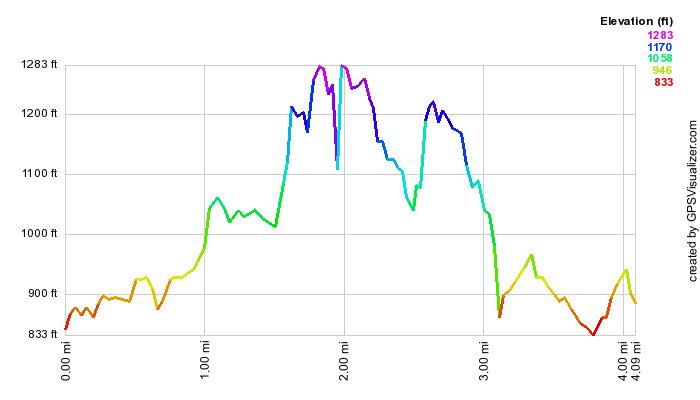 (The image at the left shows the profile of the hike. Remember that all vertical profiles are
relative!)
(The image at the left shows the profile of the hike. Remember that all vertical profiles are
relative!)
Harriman: Pingyp Mountain
| Quick Look | ||||
|---|---|---|---|---|
| Difficulty | Round trip | Total climb | Internet Maps | |
| 4.1 mi. | 920 ft. | AllTrails | ||
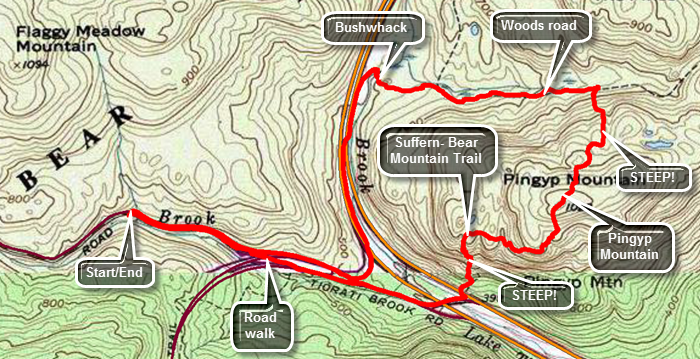
Take exit 16 off the Palisades Parkway and head west on Lake Welch Drive. When the road splits stay right on Tiorati Brook Road. Drive ,4 miles and park on thesauri shoulder of the road in a large roadside parking area. Start the hike by walking east on the road toward the parkway. The road is narrow with no shoulder and the cars move rather swiftly. The walk is downhill and you will have to walk back up this grade at the end of the hike. Continue on the road until it merges with Lake Welch Drive and then continue until you see the yellow blazes of the Suffern-Bear Mountain Trail coming in from the right at about .8 miles. The blazes are old and not very distinct but they lead to an overpass over the southbound parkway to the northbound lanes. You should see the trail on the other side of the road. Wait until there was a big gap in the traffic before crossing. As soon as you cross the road, the climb starts passing through some rocks. This might be the steepest hike in the park and it was some very narrow ledges and areas that require some rock scrambling. As you ascend the trail take advantage of any views to take pictures since the top of the mountain is wooded. On the climb from the parkway to the first place where the trail levels is .2 miles but the vertical gain is 380 feet for a 35% average grade. There are two more smaller climbs after this but each has a certain "charm". Along the way you will pass by the memorial plaque to Harold Scutt who sited the trail in 1930 and died shortly thereafter in a plane crash. The second climb has an interesting steep slab of rock to negotiate while the third had a crevice to scramble up. The first step up the crevice is huge and requires some upper body strength to make it up. After that, there the trail winds and gains some elevation to the summit of the mountain. Start to descend the north side of the mountain. It is not as steep as the route up but reaches over a 25% grade in places. At 2.1 miles the Suffern-Bear Mountain Trail reaches the base of the mountain and turns right on a woods road marked "Pines" on the map. This can be used to hike a longer loop of about 7 miles using the Red Cross and Beech Trails as well as Tiorati Brook Road. Turn left or west on the road as it heads toward the parkway paralleling a stream. Follow the road which is not blazed but pretty easy to find. You may have to detour several times as the road runs through low areas that are now marshes filled with impressive stands of phragmites. As you near the parkway, the road becomes less distinct and you will have to bushwhack your way through some brush. Depending on which route you take you will most likely have to cross Stillwater Brook. The brook is deep in places but you should be able to find some stepping stones to get you across. Walk south along the northbound lanes and then cross to the wide, wooded median. Walk the median until exit 16 and cross to Lake Welch Drive. Follow Lake Welch Drive and Tiorati Brook Road for .7 miles uphill back to the car.
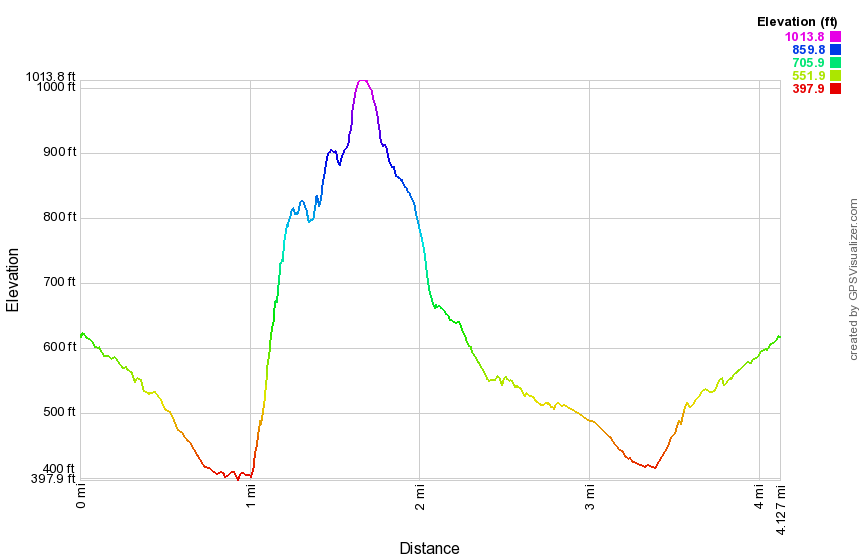 (The image at the left shows the profile of the hike. Remember that all vertical profiles are
relative!)
(The image at the left shows the profile of the hike. Remember that all vertical profiles are
relative!)
Harriman: Ramapo Torne and Russian Bear
| Quick Look | ||||
|---|---|---|---|---|
| Difficulty | Round trip | Total climb | Internet Maps | |
| 6.8 mi. | 1893 ft. | AllTrails | ||
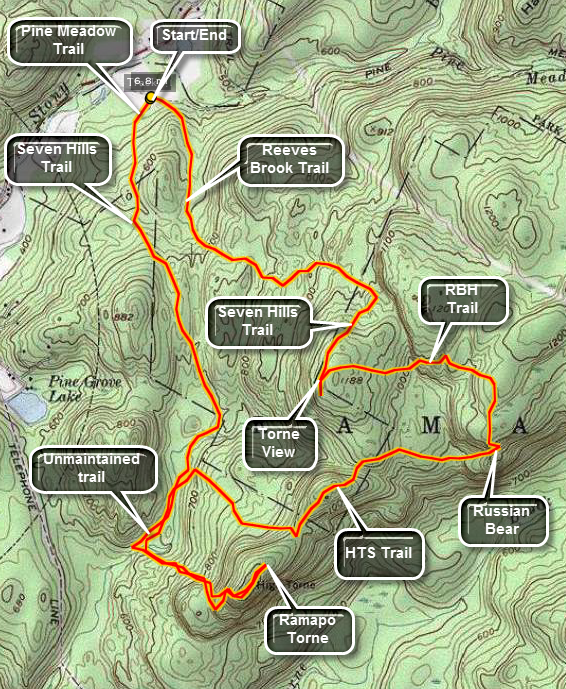
Take Seven Lakes Drive southwest from the Long Mountain Circle near Bear Mountain. Pass through the Tiorati Circle staying on Seven Lakes Drive. Pass through the Kanawauke Circle and continue southwest on Seven Lakes Drive until the parking area for the Reeves Brook Visitor's Center appears on the left. Walk to the back right of the parking area and walk briefly through a field on the red marked Pine Meadow Trail. Watch for the blue blazes of the Seven Hills Trail on the left. Continue along this trail as it rises over a hill and then descends to a junction with the orange blazed HST Trail. Turn right here and walk another .2 miles to the base of the Ramapo Torne. Turn left here and start a steep ascent to the first level of the Torne. Watch carefully as you ascend to the first level for the orange blazes that go to the left and start the ascent of the second level of the Torne. This is another steep ascent over some large, scattered boulders. At the top of the second level is one more short ascent to the very top of the Torne. Stop here to take in the views in all directions.
You can return to the trail junction and get on the blue Seven Hills Trail that leads to the HST Trail. The easier route is to continue over the Torne on the orange HST Trail. Stay on this trail as it rolls up and down. Before an obvious descent look straight ahead at the rock outcropping which is the Russian Bear. The trail descends to crosses a small stream and then begins to ascend up the Russian Bear. the trail winds around this tall rock outcropping to a set of stairs on the other side. The ascent is steep but short and the stairs help. Be sure to look back toward the Ramapo Torne for a great view. After taking in the views in all directions, follow the orange trail over the Russian Bear and watch for the black blazes of the Raccoon Brook Hills Trail.
Turn left on the black trail and walk along a steep cliff called the Pulpit. Look DOWN to the area below where you will soon be after a steep descent off the Pulpit. After the descent, look back at the Pulpit. This view makes the reason for the name more obvious. Continue on the black trail passed the white Reeves Brook Trail until it again meets the blue Seven Hills Trail. Turn left on this trail and walk a short distance until the trail starts to descend. Look ahead to the Ramapo Torne. This is Torne View. Retrace your steps to the trail junction but continue straight ahead on the blue trail. As this trail begins to descend it crosses the white Reeves Brook Trail. Turn left here and continue on this trail as it descends back toward the parking area. This trail is hard to follow at times so watch for the blazes on the trees and rocks. The trail follows a stream which has several small cascades along the way. As the trail descends an old woods road it meets the red Pine Meadow Trail. Turn left here and walk back to the parking area.
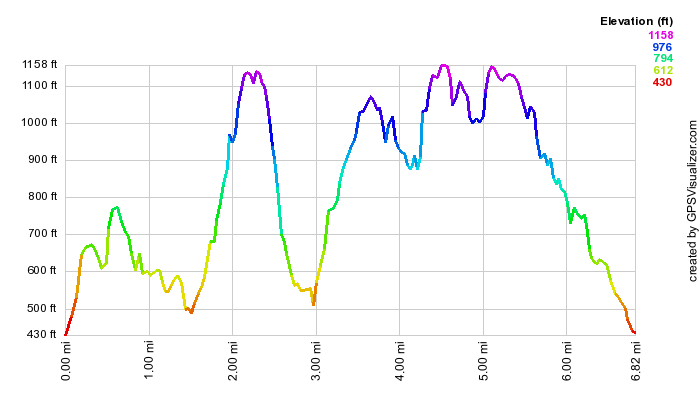 (The image at the left shows the profile of the hike. Remember that all vertical profiles are
relative!)
(The image at the left shows the profile of the hike. Remember that all vertical profiles are
relative!)
Harriman: Route 106 to Elk Pen
| Quick Look | ||||
|---|---|---|---|---|
| Difficulty | Round trip | Total climb | Internet Maps | |
| 9.3 mi. | 1936 ft. | AllTrails | ||
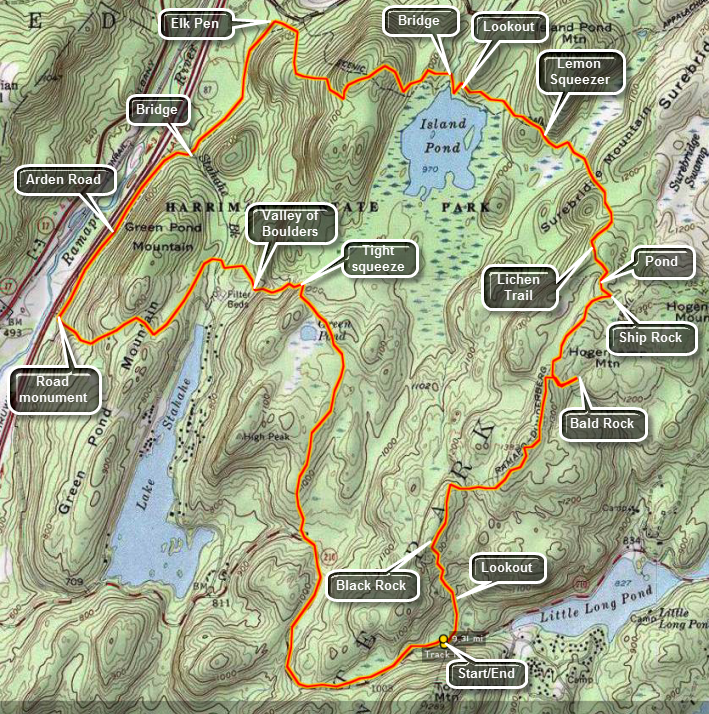
Take Seven Lakes Drive southwest from the Long Mountain Circle near Bear Mountain. Pass through the Tiorati Circle staying on Seven Lakes Drive. At the Kanawauke Circle take Route 106 west passing between the two parts of Lake Kanawauke. The next body of water on the left is Little Long Pond. Just passed Little Long Pond on a slight upgrade will be a parking area on the right for up to ten cars. There are no trailhead markers but this is the place to park. After parking walk into the woods straight ahead and watch for the red markers of the Ramapo-Dunderberg Trail.
Hike through some tress to an area with enormous and impressive rock formation. Hike up and through these formations for about .25 miles until you are on an exposed rock face with a good view of the surrounding terrain and the hills in the distance. Get back on the RD and hike across the rocky spine surrounded by a few trees. After another .25 miles you will be at Black Rock which also gives nice views. As you hike keep looking for the best views since they aren't always at specific named places along the way. In about .8 miles you will be at the Bald Rocks in an open area where many glacial erratics lie on top of strangely marked bedrock. Just after this area the yellow Dunning Trail turns left to Hogencamp Mountain and the Hogencamp Mine. To the left the trail leads to the White Bar Trail and on to the Nubian Trail near Valley of the Boulders.
Continue on the RD passing Hogencamp Mountain on the right. After ascending some open slabs of rock, take in the nice views of the immediate area, the hills and valleys afar and the little pond just below. bear right on the Rd and descend off the ridge for just a short distance. Ahead and slightly to the left will be a large glacial erratic sitting among some trees. Use you imagination to see the prow of a ship sailing into the forest. This is Ship Rock. You can continue on the RD to Times Square and return on the Arden-Surebridge Trail. It may be easier to retrace your steps back to the open rock faces and turn right on the Lichen Trail marked with a blue L on a white background. This trail has some nice viewpoints and is worth the walk. Keep a careful watch for the markers as they may be hard to spot. The Lichen Trail is only about .4 miles long. It passes over a rocky outcrop and then drops around it before rising over more open rock faces. At this point Island Pond can be seen at a distance on the left. At the bottom of a short, steep descent turn left on the red marked Arden-Surebridge Trail which runs concurrently with the aqua blazes of the Long Path.
In .8 miles you will hook up with a section of the white blazed Appalachian Trail just passed the Lemon Squeezer. Before this trail junction are several others that can mislead and confuse. An unmarked trail named the Bottle Cap is the first to appear on the right. Just a few hundred feet later the aqua blazes turn right as the Long Path leaves to the north. In this same area the white blazes of the White Bar Trail appear on the left. Stay on the red trail to an area where you will see some tight passages between the rocks. This is the Lemon Squeezer, The trail does not actually pass through the Lemon Squeezer but feel free to examine this area and walk through the tight "canyons". Just after this the red blazes turn abruptly left as the A-SB Trail turns south. Continue straight ahead on the Appalachian Trail as it works its way passed Island Pond. You will want to get a better view of this little pond but each potential viewpoint is blocked by trees. Stay on the AT as it descends to a flat area just above the pond. Walk to your right to a rock ledge and a beautiful view of this body of water. Return to the AT and cross the outlet of the pond on a small wooden footbridge. Observe the stonework that seems to form a sluice out of the pond.
The AT then ascends form the pond outlet and snakes its way over Green Pond Mountain. The ascent and descent have a few steeper areas but the switchbacks take car of most of these. As you start to descend, you may notice the sounds of traffic. At this point you are headed toward the Elk Pen which is adjacent to the New York State Thruway. After 1.4 miles on the AT and at the bottom of the hill near the Elk Pen turn left on the Arden-Surebridge Trail which runs along the surface of the old Arden Road once called the Harriman Flat Road. In .3 miles the A-SB turns left but you should continue straight ahead on the Stahahe Brook Trail and the Arden Road. After another .3 miles, this trail turns left into the woods just after crossing Stahahe Brook. Stop at the bridge to enjoy the sights and sounds of the brook running under the bridge. Bear right to stay on the Arden Road which now parallels the Thruway for .85 miles. At this point a marker commemorates the road and the builder by stating "showing the advantages of building flat roads in hilly country". Just after this memorial are the white marks of the Nurian Trail which will lead all the way back to the parking area. This trail crosses the Thruway on a raised overpass!
The Nurian Trail now climbs back over the Green pond Mountain Ridge and has a few challenging areas. In .8 miles it crosses Stahahe Brook on a double bridge where the Stahahe Brook Trail enters from the left. Be sure to bear right in this area turning east and southeast on the Nurian Trail. Within .25 miles the trail ascends slightly and then descends into a boulder strewn stream bed. This is the Valley of Boulders and is impressive for the number and variety of large rocks. the trail ascends steeply out of the valley but several switchbacks eliminate all but a few sharp climbs. In one area the trail ascends passed and through some large rock formations. The trail ascends some and joins several woods roads and other trails including the White Bar and Dunning Trails. The Nurian Trail will lead back to the RD just south of Black Rock. You can take the RD back to the parking area by retracing your steps. You may also turn right on the wide Island Pond Road as it come up on your right. After about 1 mile on this road you will be at Route 106. Turn left on the road and walk 1.2 miles back to car. Along the way you will notice a large parking area on the right for the White Bar trail as it turns south. This is the ONLY parking area with any signs or trailhead markers. Several more parking areas or pulloffs will be on the left.
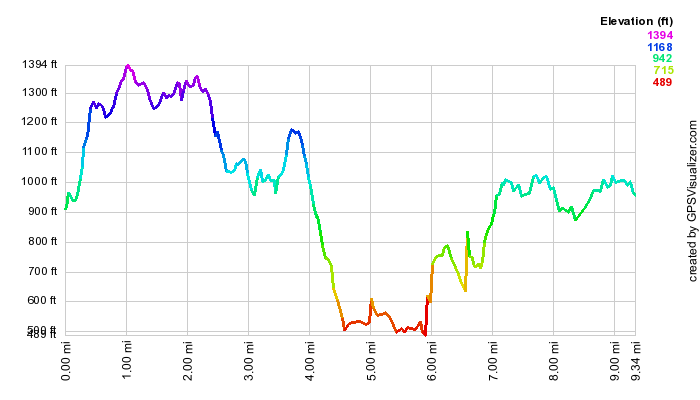 (The image at the left shows the profile of the hike. Remember that all vertical profiles are
relative!)
(The image at the left shows the profile of the hike. Remember that all vertical profiles are
relative!)
Harriman: Silvermine Lake to Black Mountain
| Quick Look | ||||
|---|---|---|---|---|
| Difficulty | Round trip | Total climb | Internet Maps | |
| 5.0 mi. | 990 ft. | AllTrails | ||
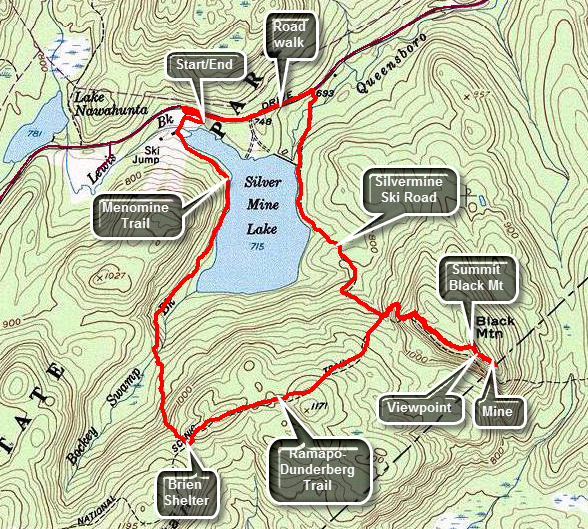
Take Seven Lakes Drive southwest from the Long Mountain Circle near Bear Mountain. Watch for the parking area for Silvermine Lake on the left before the Tiorati Circle. There are ski slopes visible from the road and parking area. Walk out of the parking area toward the lake. The yellow Menomine Trail is to the right and follows the western shore heading south. The trail is reactively flat but very rocky. There are some nice views of the lake and Black Mountain from the trail as it passes along the edge of the lake. At about .9 miles the trail begins to gain some elevation. Continue to climb to the top where the trail levels off briefly and the Brien Shelter. Just passed the shelter look for the white and red dot on white blazes of the Appalachian and Ramapo-Dunderberg Trails on the left starting near a big tree. Turn left and follow the trails up a short but steep rock scramble. In the .7 miles from the start of the climb passed the shelter the elevation gain is 400 feet. The trails head ENE and drop and the climb again. At 1.9 miles begin a descent of 250 feet over .4 miles to the Silvermine Ski Road. Cross the ski road to begin the climb up Black Mountain. The climb starts off steeply and then alternates between flatter sections and steeper ones with a rock scramble right at the top. At about 2.4 miles there is a nice viewpoint that overlooks Silvermine Lake. Continue up the trail to the short rock scrambled to the top of Black Mountain. To the right watch for a faint path that leads down to a mine that was cut into the face of the cliffs. Once at the top take in the views of the Hudson River to the east. If you walk around a little following some of the paths at the top, you may find several depressions that were dug to mine iron. The mines must not have been very productive as there are almost no tailings. Head back down the trails the way you came being careful on the steeper sections. When you are back at the Silvermine Ski Road, turn right and follow it as it winds its way down to the shore of the lake. The road is interesting and obviously well-constructed. It dates back to when the entire park belonged to the Harriman family. Follow the road as it descended toward the lake and then parallels it until the outlet of the lake. The road then turns from north to northeast and follows the brook until crossing it on a bridge. Continue to follow the ski road until it intersects Seven Lakes Drive. Turn left and walked the road .6 miles back to the car.
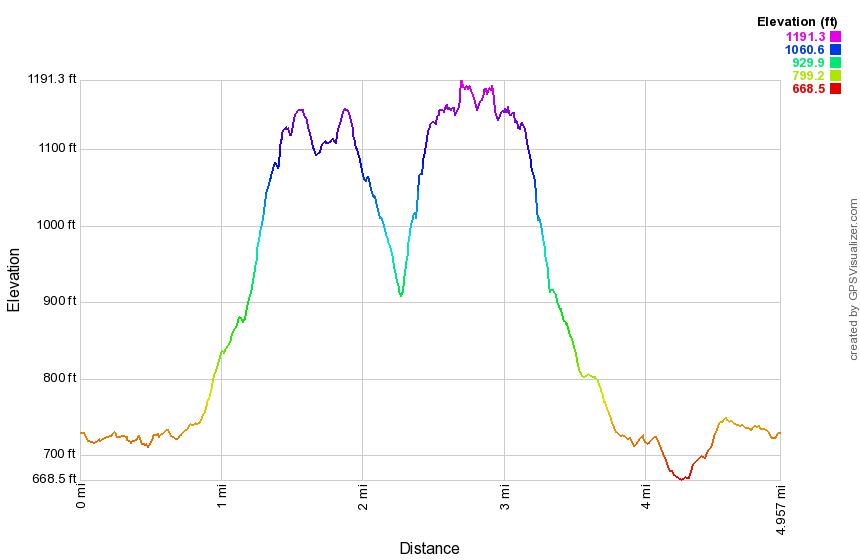 (The image shows the profile of the hike. Remember that all vertical profiles are
relative!)
(The image shows the profile of the hike. Remember that all vertical profiles are
relative!)
Harriman: Torrey Memorial
| Quick Look | ||||
|---|---|---|---|---|
| Difficulty | Round trip | Total climb | Internet Maps | |
| 1.2 mi. | 360 ft. | AllTrails | ||
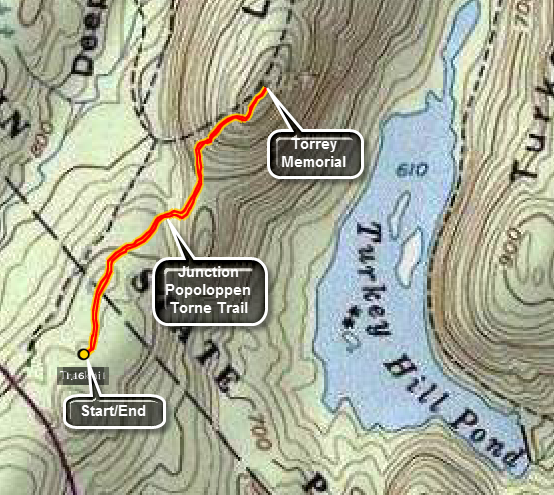 Take I86, the Quickway, to the exit just before the Harriman toll plaza and get on Route 6 East. Drive a little more than 4 miles to the parking area on the left where the Long Path crosses the road. You may also take Route 6 West from the Bear Mountain traffic circle for less than a mile. In this case the parking area is on the right. From here the Long Path heads northeast toward Long Mountain and passes the Torrey Memorial on the way. Raymond Torrey was a founding member of the new York New Jersey Trail Conference and instrumental in the creation of the Long Path. The first part of the trail descends and crosses the Popoloppen Torne Trail. Stay on the Long Path and start a short ascent up a hill. The trail flattens out at the top and the memorial is a message carved into the exposed bedrock at the top of the ridge. The views are good and you see the Perkins Tower on Bear Mountain. Turkey Hill Lake lies below with its rocky but secluded shores. This hike definitely has a lot to offer for very little effort.
 (The image below shows the profile of the hike. Remember that all vertical profiles are relative!)
Harriman: Turkey Hill to Route 6
| Quick Look | ||||
|---|---|---|---|---|
| Difficulty | Round trip | Total climb | Internet Maps | |
| 7.2 mi. | 1887 ft. | AllTrails | ||
 Take I86, the Quickway, to the exit just before the Harriman toll plaza and get on Route 6 East. Drive a little more than 4 miles to the parking area on the left where the Long Path crosses the road. You may also take Route 6 West from the Bear Mountain traffic circle for less than a mile. In this case the parking area is on the right. From here the Long Path heads northeast toward Long Mountain and passes the Torrey Memorial on the way. Raymond Torrey was a founding member of the new York New Jersey Trail Conference and instrumental in the creation of the Long Path. The first part of the trail descends and crosses the Popoloppen Torne Trail. Stay on the Long Path and start a short ascent up a hill. The trail flattens out at the top at around .7 miles is the memorial with a message carved into the exposed bedrock. The views are good and you see the Perkins Tower on Bear Mountain. Turkey Hill Lake lies below with its rocky but secluded shores. Continue following the aqua blazes and over the next half mile drop 420 feet as the trail descends the steep side of the ridge. Several switchbacks moderate the grade but it still averages 15%. When a layer of damp leaves covers the slippery rocks a quick descent is impossible. At about a mile the well-worn track seems to go straight ahead but the trail turns to the right. Near the bottom of the descent cross a stream by hopping from rock to rock which is easy when the water level is low. There is a "bridge" present but it has seen better days. The construction consists of two logs that were cut on site to span the stream. The "decking" is made of branches lashed to the logs with very old rope. At 1.25 miles the trail turns to the left and starts to travel due west on what looks like a right-of-way or woods road. On the right are signs indicating that the land is part of the West Point Military Reservation. Start an ascent of 470 feet over .66 miles to the top of Howell Mountain. Near the top of the ascent is a rock outcropping where large cubical blocks of rocks have split off. As you begin to descend the 430 feet from Howell Mountain you can see the next ridge. The descent has a few switchbacks to help where the slope is the steepest. At the bottom of the descent cross the outlet stream to Lake Massawippa on large stepping stones placed by a trail crew. The Brooks Mountain ridge lies ahead and hiking directly up the ridge would have mean gaining over 200 feet in about 400 feet! Fortunately the trail turns north to ascend on a shallower slope and then turns southwest in a major switchback at about 2.8 miles. The trail picks up a woods road that gently ascends the ridge to the summit at 1080 feet. There are only limited views from the top. Descend off the ridge heading southwest until at 3.6 miles you come to Route 293. Along the way the trail shifts direction turning to the northwest. Walk up to the road passing a culvert that directs Popolopen Creek under the pavement. Cross the road and face another ascent up the Blackcap Mountain ridge. Blackcap Mountain has a maximum elevation of 1381 feet but the trail turns southwest at less than 1200 feet. Continued to walk through hardwood forest and begin the climb up the ridge. At 4 miles and about 1180 feet the trail turns 90 degrees and heads southwest again along the base of the ridge. For about a mile the trail is straight as an arrow heading southwest toward Route 6. There are some ups and downs in the trail but nothing compared to the ridges you have already crossed. The trail does not actually intersect Route 6 but as you near the road it is easy to walk out to the pavement. Cross Route 6 and eventually Route 293 as well. The traffic can be very heavy but the shoulders are wide. At 5.6 miles Route 6 passes between Lake Massawippa and Lake Te-Ata. Continue on Route 6 back to the parking area on the left.
 (The image below shows the profile of the hike. Remember that all vertical profiles are relative!)